| Week 5 - Materiality | |
|---|---|
| Course | Arch 124A |
| Date | |
| Learning Objectives | This workshop will cover the basic tools used in photoshop renderings. Understanding when to use one tool over another will allow you save time and efficiently create finished work. |
| Agenda |
|
| Uses Tool(s) | [[photoshop cs6|]] |
|tool=Tool:Photoshop CS5, |date=2012/09/18 }}
Introduction
Vector vs. Raster
To understand when it's best to use Photoshop, you need to get a handle on vector and raster images. A rasterized image is made up of
pixels
and does not scale up without decreasing quality, while a vector image contains is merely
point information
connected by specific curve angles and can be scaled up without any loss of quality.
RGB vs. CMYK
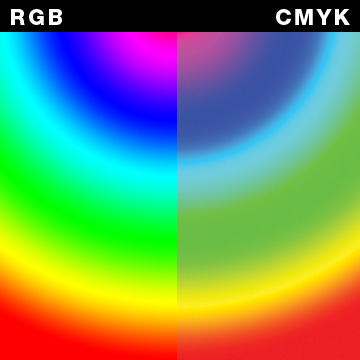
Digital images are conventionally displayed in RGB (Red, Green, Blue), as these primary colors represent the purest way to translate color information, while printers translate the RGB values into CMYK (Cyan, Magenta, Yellow, Key-black), using a secondary color spectrum to represent color. This simple distinction means things look different when you print them from what they appeared to be on your screen. This is why test-prints are vital to a successful representation of your work.
DPI/PPI Settings for Print/Digital
DPI refers to "dots per inch" and PPI refers to "pixels per inch". These are relatively interchangeable terms and both refer to the density of a pixel grid when producing final images for printing or digital display. The quality of a digital display will invariably be better than a printed image and you probably encountered this distinction when preparing your portfolio for grad school. To this extent, when we are producing images for print, we tend to want higher DPI/PPI settings.
Standards:
Print - 300 DPI, Digital - 100DPI
The industry standards for print images (those you'll find in all quality magazines) is 300 DPI, which is very clear, while you can usually get away with +/- 90 to 100 DPI for digital only images (72 DPI being the absolute lowest). This means that if you created an image for digital use only at 100DPI and then wanted to print it out later, you'd want to save the file with an increased DPI if you don't want the quality to be reduced when it's printed. This applies especially to your renders! Often, you'll have two versions of certain files - one for print and one for digital use only.
Layers
The various elements in your image start with a base layer that is added to with subsequent, additive layers. By working with your changes as layers, you be able to turn on and turn off elements in the canvas and allow for a versatile working image, not an unchangeable singular image. Using the layers panel is an essential tool for photoshop at all levels of expertise. Window>Layers
Layer via Cut
After you have any part of your base image selected, you can select Layer>Layer via Cut to cut the selected area out of your base image and paste it on a new layer, which you should then rename to something specific. This is helpful if you know you will not need to keep the selected area in your base image and want to begin removing parts from it.
Layer via Copy
Similar to Layer via Cut, Layer via Copy (Layer>Layer via Copy) simply copies your selected area and pastes it into another layer. It's essentially the same as copy and paste, but it makes sure whatever you have selected remains in place and doesn't jump around, which can happen during copy and paste. Use Layer via Copy if keeping the same location is important.
Selection Options
The selection tool in the tool bar comprises a variety of ways to select certain areas within an image. Regardless of what selection method you choose below, you can edit what is and is not selected at any time, assuming you haven't locked your layers. To select more than one part of an image while using any of the below methods, you simply need hold SHIFT and continue to select additional areas. This will add the new area to your selection. If you hold ALT and select areas within a selection, those areas will be removing according to the same selection criteria. Understanding how to add and remove parts of your selection will help you to make the best overall selection of any aspect of your base image or images, potentially giving you near pixel perfect selections if you take the time.
Marquee Selection
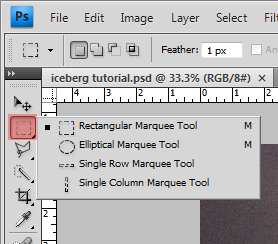
The marquee selection tool includes rectangular box selections, elliptical and circular selections, and single row and column selections. These tools are not detail oriented unless your selections are perfectly orthogonal, elliptical or circular. However, if you selecting large, blanket spaces across an image for whatever reason, the rectangular selection tool can come in handy to cover a lot of surface area quickly, such as "
selecting everything on the left side of the page
". The list of marquee tool options that is shown in the above image comes up when you hold the mouse button down on the marquee selection button.
Toolbar Tip : Whenever you have the small triangular tab at the bottom right of any toolbar icon, you can hold your mouse down on it to reveal the additional commands inside of it.
Lasso Selection
All Lasso tools require that for an area be selected, it must be fully encompassed, so the beginning point and end point must touch eventually, creating an enclosed space in between. If you double click your last point, it will automatically snap back to the beginning point to complete the enclosure, creating a straight line in between the points (last and first).
- Freeform Lasso
- Polygonal Lasso
- Magnetic Lasso
The Freeform Lasso
is like drawing a sketchy line around something. It's loose and does not allow for high precision. However, like the rectangular marquee tool, it can help to select pre-cut areas in a layer. Use it like a pencil for highlighting, not a knife for cutting.
The Polygonal Lasso
is an effective way to select small areas that cannot easily be grouped by photoshop into other selection options. Generally, thin pixelated lines are tough to select without the polygon lasso tool, and high-detail spaces look best when cleaned up with the polygon lasso tool.
The Magnetic Lasso finds contrasting edges based on a frequency of sampled points on the image. The detail of the magnetic lasso can be adjusted by changing the frequency (higher is more detailed), while the contrast level can also be adjusted. This tool generally does not work well on right angles, but works quite well on irregular shaped objects. However, you'll need to move slow and be patient. If you make a mistake, you can simply select "delete" to remove the last point in the line.
Quick Selection and Magic Wand Tool
- Quick Selection Tool
- Magic Wand Tool
The Quick Selection Tool
allows you to draw at a specific pixel size all the area that you want to select, automatically finding edges close to where you draw your line. As long as you keep your selection within the boundary you want to stay within, the quick selection tool will seldom veer away from this boundary. By adjusting your pixel size, you can touch up a selection done with quick selection by adding or subtracting from the initial selection.
By default, the quick selection tool adds areas without having to hold shift, and to remove areas, you can select the upper quick selection tool option with a negative sign next to it. However, the standard
SHIFT
for add and
ALT
for remove will still work as well if you're used to using them.
The Magic Wand Tool
is a great way to select areas of similar tone and color. Subtle shade changes are hard to depict with this tool, and better left with other selection options, but when it comes to finding like colors, this tool is the best. It automatically finds the outer most edges that share similar tones and colors according to a tolerance setting in the upper options. A low tolerance will focus on VERY similar pixels, while a high tolerance will incorporate a larger variety of similar colors and tones. Playing around with the tolerance can help you fine tune the magic wand tool for a specific image or area within an image.
Tool Tip : When making complex selections, feel free to save them by clicking "Select>Save Selection". This will allow you to bring up the selection on another layer or the same layer later on without having to take the time to re-select a complicated path.
Refine Edge
Note: The below image is from CS3, and doesn't include the "smart radius" button. In all updated versions, this button should be checked if the radius within Refine Edge is going to be adjusted.

Refine Edge is a part of each selection tool option. It allows for subtle changes to be made to the selected area after it has been selected.
Contraction and Expansion
basically is an offset of the originally selected line, while the
radius
will round off your corners to and help to soften the selection, should you favor that.
Feather
and
Smooth
only further the softening capabilities of Refine Edge.
Refine Edge helps a lot when selecting tree lines and other foilage and can offset the amount of direct pixel editing you have to do. It can also make your selection look weird, so don't overdue it on the radius option.
The preview allows for a variety of options to view the refined edge changes. The red transparent fill option works well to call out the selection, but it really comes down to personal preference.
Masks and Channels
Layer Masks
Layer Masks are simple ways to view only certain areas within a layer. It allows you to retain the original layer in its entirety while only viewing a part of it. The Black area in the Layer mask is the "hidden" or "protected" part of the mask, while the white area is the "shown" or "revealed" part of the mask. When working with layer masks, we are only working with black (hidden) and white (shown). Layer>Layer Mask
Clipping Masks
Clipping masks are a fast way to clip a layer to a specific area. This works between two layers, where the bottom one is the guide and the above one is the layer that is clipped. The guide layer acts like a layer mask, where all visible parts of the layer are guiding where the above layer will show up. When applying the clipping mask, the guide layer is hidden by the clipped layer above. This works for any irregular shaped selections and works for text too.
I find clipping masks to be the most helpful when you think of it as the bottom layer
drawing in
the top clipped layer. The example of grass below demonstrates this well. You can right click on a layer and select Create Clipping Mask or go to Layer>Create Clipping Mask.
Channels
Channels represent the areas of Red, Green, and Blue in each pixel within your layer. If you select the Red channel, a black and white image will show up that reveals where there is red color information (highest being white and lowest being black). The same applies for the Green and Blue channels, revealing different black and white images when selected. This can help you pinpoint where certain colors are within your layers or overall image. If you save a certain selected area (Select>Save Selection), you'll create an "alpha channel" in the channels menu, which will focus the results to that selection only. Window>Channels
Adjustments and Adjustment Layers
Adjustments are changes made directly to a layer. They are not editable after you've accepted them and are to be used only on layers that are specific to the particular adjustment. Layer>Adjustments
Adjustment Layers , on the other hand, allow me to make changes to all of the layers beneath the adjustment layer without changing the individual layers themselves. The adjustment layer, like the layer mask, creates a black and white canvas (black for hidden and white for shown) that applies the adjustment only to the white area. Layer>New Adjustment Layer
Common Uses of Photoshop
Adding Entourage
Adding entourage is basically referring to "background" and "supporting" layers that bring your base layer to life. The base layer could be a rendering, photograph, diagram, etc. The entourage layers are usually people, trees, skies, shadows, cars, other photos, etc. Making sure that these layers fit the scale and location within the base layer is crucial for them to not look "photoshopped". Unless you're a pro, it's usually obvious that a image is manufactured or altered, but consistency across this process will help your drawings not look haphazardly created and will not distract from the drawings intention.
Common problems:
shadow angle, correct perspective, scale, and light levels.
Light and Color Adjustments
There are quite a few adjustments in Photoshop that are useful. Some of the most common are explained below. Image>Adjustments
Brightness and Contrast
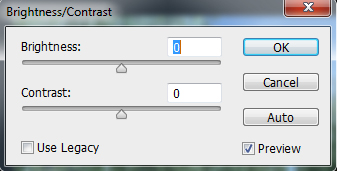
Brightness and Contrast is a basic tool for quick fixes in Photoshop. It's not detail-oriented and generally doesn't get used unless the preciseness of your image is not a big deal. Image>Adjustments>Brightness and Contrast
Levels
Levels is an adjustment that will generate a histogram of the light values in your image, which you can adjust in order to incorporate more light or dark into your layer. How much lightness and darkness can be individually adjusted with levels to bring out a range of fine adjustments. Image>Adjustments>Levels
Curves
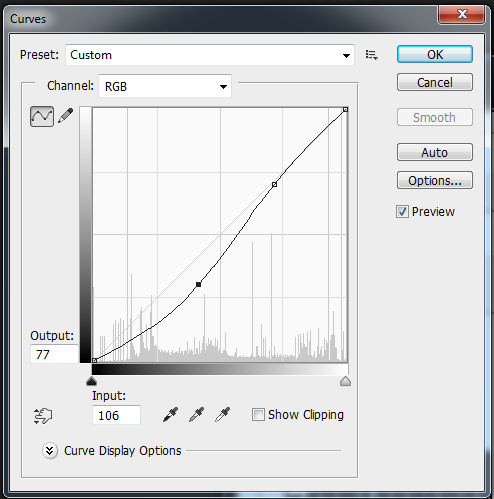
Curves allows for a graphic representation of the levels tool, whereby you can adjust a "curved" path histogram, leveling potential sharp shifts in light values. Image>Adjustments> Curves
Hue and Saturation
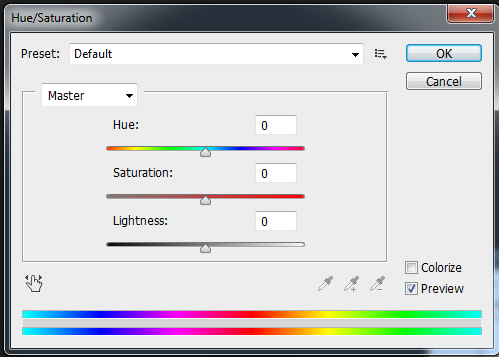
Hue and Saturation is commonly used to either add a specific layer of color to your layer that can be adjusted in terms of saturation and brightness. If too much color is going on, you can also decrease or increase the color values in either your entire layer or image or within a certain selected area by just using the saturation slider. If you wanted to completely remove all color, you can also select "Desaturate" in the Adjustments Layer. Image>Adjustments>Hue and Saturation; Layer>Desaturate
Compositing Images
As you might have guessed, compositing images can take a lot of time. Generally, if you need to cut out a selection, the polygon lasso tool is the fastest solution, but it can take some time and be imprecise if you want detail. This is why using "refine edges" and "clipping masks" will save you a lot of time if you if you use them wisely. If you know you don't want to use anything but one area in an imported layer, you can select the unwanted area and delete it, but if it's complex, you may want to save the selection and go back to edit it at some point, which means you'd still need the original image to not be edited. If this is the case, you'll need a clipping mask to be made (explained in the Intro). Even after the images are lined up perfectly, you'll still need to probably blur the seam line and adjust the layers so light levels are comparable.
Common problems: Seams are too sharp, Levels aren't matching up
Collage Materiality
Though we are going to touch on this again in Workshop 4C, Collage Materiality is a way to fake materials in Photoshop rather than rendering them in Rhino. It can save you loads of time trying to render wood, concrete, green space, and glass. Essentially, you leave all of these aspects blank in your base render, selecting a non-confrontational white material for the most part, and then overlay the colored images of your materials onto this space, adjusting for point-of-view, light and scale.
Additional Photoshop Tools
Actions
Actions are a quick way to repeat redundant and repetitive tasks, such as resizing many images from a site visit or making a folder of images all black and white. More complex results can also be achieved if a specific end product is desired. Actions basically allow you to record the buttons you hit as "steps", which you can then use to effect other images without having to repeat the clicks. They can be as complex or as simple as you want.
A workflow that goes through the creation and use of Actions can be found here:
Using Actions for Repetitive Tasks in Photoshop
Clone Stamp
The clone stamp allows you to take a "snapshot" of an area according to your swatch size and "clone" it or "paste" it to another area. This generally works for small detail touch-ups, rather than large area fixes. This is because the clone stamp doesn't simply copy the one area you have selected in your swatch, but also the surrounding areas, which come into view as you drag your swatch. If you are cloning a sky area that is to the left of a building in your image, as you place the stamp down and move it to the right, the building will eventually come into view.
A detailed look at Clone Stamps can be found here:
Clone Stamp Tool
Transform
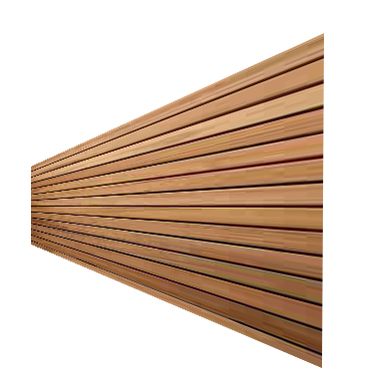
The Transform and Free transform options (Edit>Free Transform, Edit>Transform) will enable you to skew, scale, distort and warp your images or image selections accordingly. You may want to take a material and skew it so it matches up with a perspective plane to achieve a texture mapping effect, or you may need to fix a area of your image that doesn't line up properly.
The Transform option also helps you rotate your image or image selection by specific degree amounts and contains Flip Horizontal and Flip Vertial , which are essentially mirroring commands.

