| Clipping Mask | |
|---|---|
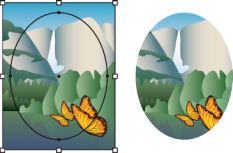
| A clipping mask is an object whose shape masks other artwork so that only areas that lie within the shape are visible—in effect, clipping the artwork to the shape of the mask. The clipping mask and the objects that are masked are called a clipping set. You can make a clipping set from a selection of two or more objects or from all objects in a group or layer. | |
| Part of | Illustrator CS5 |
| Part Type | Method |
| Screenshot |

|
A clipping mask is an object whose shape masks other artwork so that only areas that lie within the shape are visible—in effect, clipping the artwork to the shape of the mask. The clipping mask and the objects that are masked are called a clipping set. You can make a clipping set from a selection of two or more objects or from all objects in a group or layer. The topmost object become the clipping object, or "frame" of all the objects behind it.
Steps
Illustrator housekeeping
When making a clipping mask it is important that the object that is doing the clipping is above the object being clipped. They can be on different layers or you can simply right click on the clipping object and click arrange -> bring to front.
Compound paths
You may find that you want to use several unconnected shapes to clip an image. The shapes need not be connected or grouped to do this. In fact it is better if the shapes are not grouped. Select all the shapes you want to use for a clipping mask -> object -> compound path -> make.
Editing clipping masks
Like many things in Illustrator, clipping masks can be edited post creation. Edges can be moved by double clicking into the clipping group and using the white direct selection arrow.
Bringing back outlines
When a clipping mask is made the clipping object automatically loses its attributes, like line size/color. If you want to reinstate any of these attributes twirl open the clip group in the layers panel and select the “compound clipping path” layer. You can now adjust line.
Releasing clipping mask
If you no longer want to use a clipping mask right click on the clipped object and select release clipping mask.
Duplicate Content
Clipping masks help frame different objects, both linework and images, from view on the artboard by creating a "mask" on top a group of objects. The topmost object becomes the clipping mask that frames the objects underneath while also keeping all the objects intact as items within the clipping group.
Object-level clipping sets are combined as a group in the Layers panel. If you create layer-level clipping sets, the object on top of the layer clips all of the objects below it. All operations that you perform on an object-level clipping set, such as transformations and alignment, are based on the clipping mask’s boundary, not the unmasked boundary. Once you have created an object-level clipping mask, you can only select the clipped content by using the Layers panel, the Direct Selection tool, or by isolating the clipping set.
General rules:
- The objects that you mask are moved into the clipping mask’s group in the Layers panel if they don’t already reside there.
- Only vector objects can be clipping masks; however, any artwork can be masked. (Object must have an vector outline to determine the clipping mask shape.)
- If you use a layer or group to create a clipping mask, the first object in the layer or group masks everything that is a subset of the layer or group.
- Regardless of its previous attributes, a clipping mask changes to an object with no fill or stroke.
Steps
- Make sure that the clipping object, or "Frame" you would like to use, is arranged on top of all the other objects. This includes layer order and object order. To change the order, right-click on the object and select "Bring to Front." Note that whatever properties the object has, such as fill or stroke, will be removed as the object becomes the clipping mask.
- Select all of the objects, both the objects you would like to clip and the clipping mask object (or "frame"). When all of these are selected, right-click and select "Make Clipping Mask"
- The objects should all be condensed into one group called a clipping object. Use the direct selection tool to edit the contents of the clipping mask.
- To remove or add objects from the clipping mask, select the object with the direct selection tool and move it in the layers panel out of the clipping group.
- To undo clipping masks, select the clipping object (with the macro selection tool) and right-click, "Release Clipping Mask"
Common Problems
Clipping mask are helpful tool to control images and linework in Illustrator however they can easily increase the file size. When working with many images, consider using InDesign rather than Illustrator.
Practice
- Combining Images and Linework in Illustrator
- This video based workflow gives an overview of the different assets of using clipping masks in Illustrator.
Resources
- Using Clipping Masks to Combine Images and Line Drawings
- This tutorial will introduce the basic concepts in order to use clipping masks effectively, and then run through a series of progressively complex examples.


