| Materials & Layers | |
|---|---|
| describe this part here | |
| Part of | VRay |
| Part Type | Entity |
| Screenshot | [[File:|320px]] |
Introduction to Materials
There are two ways to access the Material Editor in V-Ray: from the toolbar and from the Object Properties panel. Using the V-Ray toolbar, left click on the icon that looks like a tag with the letter "M" on it. Or, select the object(s) to create a V-Ray material for. Use the Properties command and select Material from the drop-down menu. Assign by Plug-in and then click Create.
Creating Materials
Open the Material Editor in V-Ray. Right click on Scene Materials and select "AddVrayMtl."
Assigning Materials
Materials can be attributed to both layers as well as individual objects by using the Material Editor. Materials can be made up of different layer attributes (such as texture, transparency, bumps, etc) in effort to not read more than a flat texture mapping. Sometimes these layers depend on a value (such as intensity or a percentage of transparency) while other times they come from a gray-scale image.
You can quickly view what these materials look like by changing the view to Rendered View which offers a simplified version of the texture maps on the object. However many of the details will change once you actually render the image so it is important to test render throughout the process to check your work.
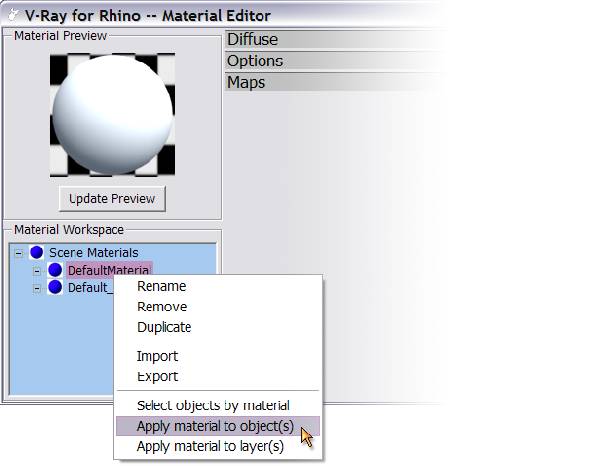
The next step is to attribute the material to objects or layers. Materials can be applied in two ways: from within the V-Ray Material Editor, or within an object's Properties in Rhino.
In the V-Ray Material editor, right click on the material name, and then click on either "Apply material to layer(s)" or "Apply material to object(s)".

To attribute the material to objects or layers in Rhino, select the objects or layers. Then, use the Properties command and select Material from the drop-down menu. Assign the material by Plug-in, and then click Browse to select the desired material (in the case of this workflow, the material is called Screen1).

Diffuse Layers
- Diffuse Color
- Change the overall color of an object OR texture map an image onto the an object by selecting the "m" box.
- Transparency
- Change the overall transparency of an object OR map a transparency pattern onto the object. Black is completely opaque and white is completely transparent.
Emissive Layers
- Emissive
- Changes the object to become an emitter. Change the intensity to affect how bright the light source becomes. Can change color, intensity, and transparency.
Reflection Layers
- Reflection
- Adds reflection to the object. White is completely reflective (like a mirror) and black is non-reflective. By Default the reflection layer has a fresnel map which varies the amount of reflection based on the viewing angle (notice the capital M next to the Reflection layer). To make more reflective, increase the Fresnel IOR.
Refraction Layers
- Transparency
- The darker the Refraction Transparency, the more the material references the edges of the objection (although transparent).
- Fog Color
- Use this rather than Refraction Color to change the color of the transparent material. Fog color is dependent upon the multiplier, the color and the size of the object. Be sure to pick a color that is slightly less saturated that you desire.
- Glossiness
- Helps change the frostiness of the transparent material. The lower the number, the more blurry the refraction.
- IOR (Index of Refraction)
- Essentially the degree to which the angle of light entering the material changes upon exiting the material. Calculated the light refracted from the tranparent object. Lowering the IOR decreases the intensity of the Refraction settings.
Maps
- Bump Map
- Changes the way the surface texture appears three-dimensionally, changes the surface normal to create the illusion of surface detail.
- Displacement Map
- Actually changes the way the surface appears three-dimensionally (such as outlines and edges of the surface) to represent a textured surface
- Background Map
- GI Map
- Reflection Map
- Refraction Map

