| Week 01 - Solid and Void | |
|---|---|
| Course | Arch 100a |
| Date | 2014/09/05 |
| Learning Objectives | 1) Modeling space and form as a complementary and subtractive process via three dimensional spatial construction. 2)Designing a third condition from the intersection of two conditions. |
| Agenda |
|
| Uses Tool(s) | Rhinoceros for OSX |
Meet The Rhinoceros
(10 minutes)
The Basics
Background
Rhino is a 3-D modeling software commonly used for industrial design, architecture, marine design, jewelry design, automotive design, CAD / CAM, rapid prototyping, product design as well as the multimedia and graphic design industries. Many plugins work with Rhino that do everything from parametric modeling to photo-realistic rendering.
Learning Rhino is like learning to speak a new language, and like learning any new software, can be very frustrating at first.
NURBS
 Non-uniform rational basis spline (NURBS) is a mathematical model commonly used in computer graphics for generating and representing curves and surfaces, and is the basis of 3D modeling in Rhino. Rhino can also deal with rational surfaces and meshes. While the math behind NURBS is complex, the important thing to remember is that the geometry in Rhino is defined by control points that you can manipulate.
For an in depth look at NURBS see: Context:Overview of NURBS Geometry or visit TUDelft's site wiki page here .
Interface
Rhino works with both text based commands typed directly and point-and-click visual menus. For a comprehensive list of commands access http://docs.mcneel.com/rhino/5/help/en-us/commandlist/command_list.htm
As you use various commands, you will notice that Rhino will guide you through the command, asking for various inputs along the way in the command bar.
PC vs. Mac
We will be teaching and working with Rhino on PC. If you are running Rhino on a Mac there is a good chance you'll run into issues that we cannot take the time to remedy. Additionally, the interface is different on each and it may be difficult to follow along.
The Basics
Viewports
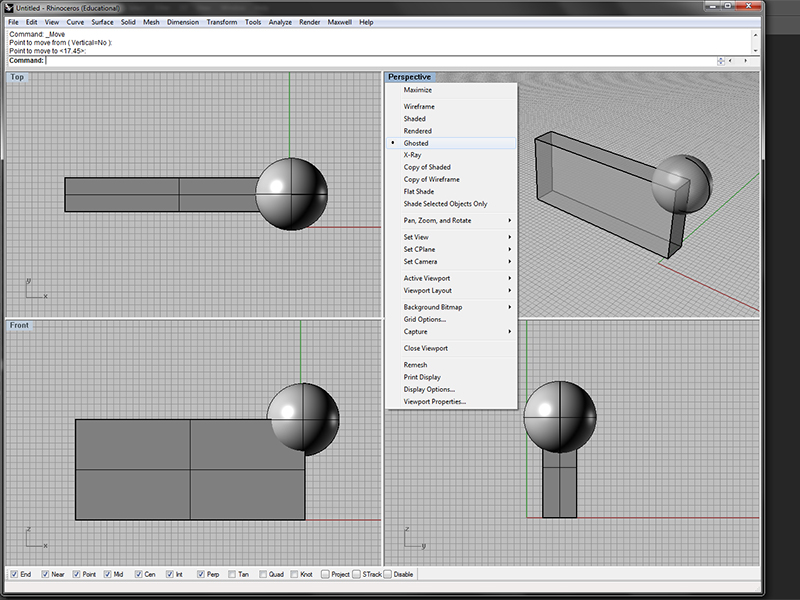
Like most CAD programs, Rhino works with multiple viewports. Double click on the title of the viewport to maximize it (and minimize) or right click to change the way geometry is viewed (wireframe, shaded, etc.). Zoom in and out with the wheel on your mouse, and pan by holding down the right mouse button and moving your curser. For more information access Tool:Part 74655Osnaps
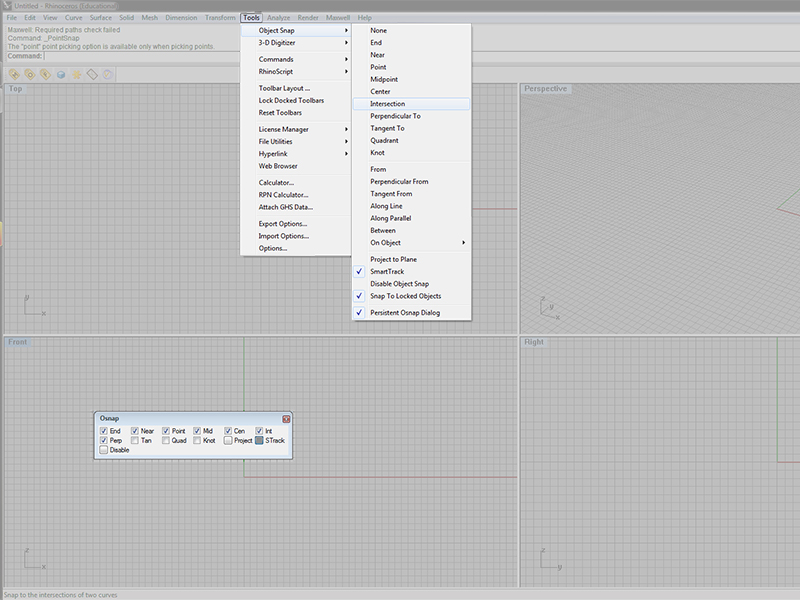
'Object Snaps' refer to your ability to determine what type of geometry your cursor selects (end points, middle points, etc.). They are an important part of modeling accurately, and you should be constantly toggling these on and off. When you open Rhino you should have the "Osnap" menu open. If not you can access it from the "Tools" menu or just type Osnap.Layers
Using layers is critical to keeping models organized and clean - especially when we begin to create 2D linework from complex shapes and export to Illustrator. Access your layer menu by typing Layer.Properties
The properties window gives detailed information for selected geometry - most importantly what layer your geometry is on. Access the properties menu by typing Properties.
Modeling
(35 min) For our purposes, and in general, it is best to have an idea of what you want to create before you begin modeling in Rhino. Simply experimenting in Rhino will rarely result in compelling results. This means you should spend time with pencil and paper prior to entering Rhino space.
Basics
Explore the basic these basic commands under the "Transformation" menu.
- Move, copy, rotate, delete, mirror,
Lines and Curves
Lines are composed of points, and may be a single "Line", "Polyline", or "Curve". This can be a confusing part of Rhino - for even though the commands differentiate between a "Line" and a "Curve" all linework is considered a curve by Rhino. For instance, the "SelCrv" (select curves) command will select all curves, polylines, single lines, rectangles, circles, etc. in your file.
There are many commands for producing curves. Access these options under the "Curve" menu or curve palette. Some of the most common and useful commands are: line, polyline, rectangle, circle and arc.
- "Curve" and "InterpCrv" will create 'free-form' curves, but the results lend themselves to less accurate modeling.
There are many editing commands for 2D linework. Some of the most useful include:
-
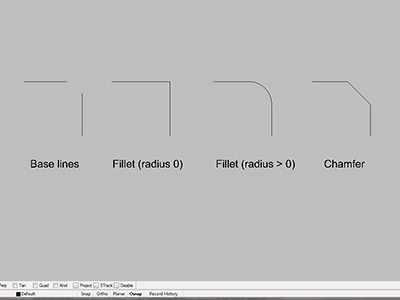
- Fillet : Add an arc between two curves and trims or extends the curves to the arc. If the radius is set to zero you will create a right angle.
- Chamfer : Create a line segment between two curves and trims or extends the curves to meet it.
- POn (points on): Display curve and surface control points for manual editing.
- Trim : Cut and delete selected portions of an object at the intersection with another object.
- Split : Divide objects using other objects as cutters.
Surfaces
There are various ways of modeling surfaces. You can access these options under the "surface" menu or tool palette.
Planar Surfaces
- Plane, Plane (Vertical), PlanarSrf, PlaneThroughPt, CutPlane,
- These are used to create a planar surface, and therefore require that foundation linework be planar. The 3-point option can be very useful when using the "plane" command.
Extruded Surfaces
- ExtrudeCrv, ExtrudeCrvAlongCrv, ExtrudeCrvTapered, ExtrudeCrvPoint,
- When working from existing linework, such as a plan and section, these extruded tools are very easy to use and allow for high degrees of precision.
Non-Planar Surfaces
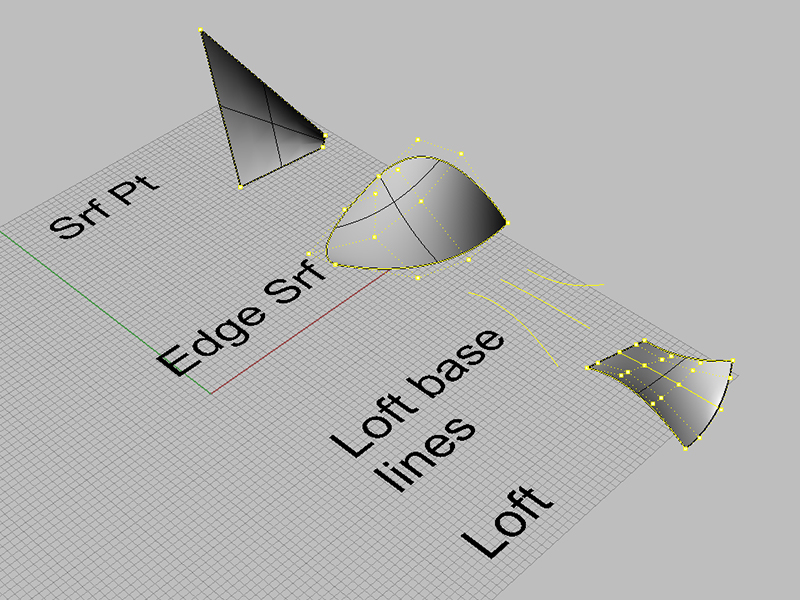
- SrfPt, EdgeSrf, Loft, Revolve, Sweep1, Sweep2
- When simple extrusions won't work, these tools allow more input. "loft" and "sweep" can be powerful generators of form, but require careful base linework.
Solids
In reality, there are no "solids" in Rhino. What we call solids are closed polysurfaces. This means that if you trim or split a "box" - you will see a hollow volume inside rather than a solid surface.
Stock Polysurfaces
Rhino can quickly create many geometric "solids" (rational surfaces) by clicking on the "Solid" menu or palette. These include:
- Box, sphere, cylinder and cone.
Extruding Polylines and Surfaces
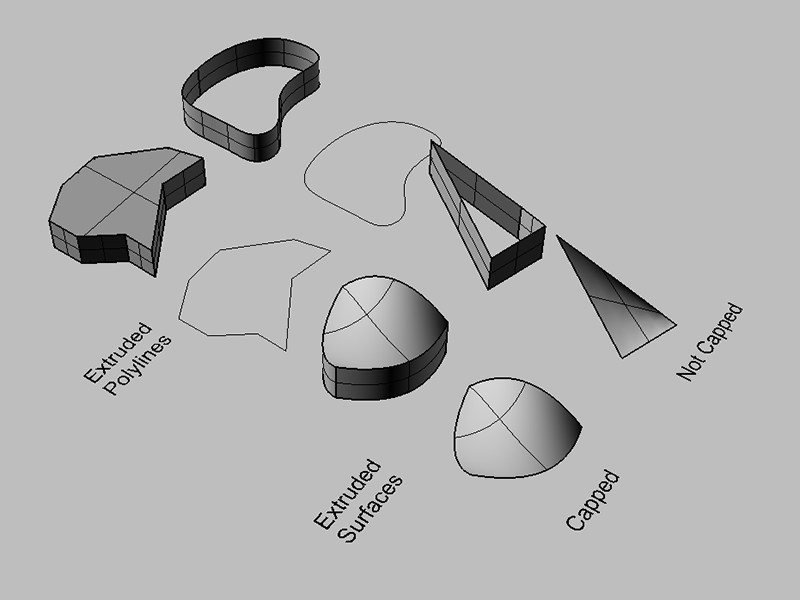
- Another method for creating a "solid" is by extruding a Polyline . First create a closed curve (no gaps in the curve), either with multiple single lines, curves, or a polyline. Then use the ExtrudeCrv command (select the "cap" option to close the volume).
- Once you have created a surface, whether planar or not, you can extrude that surface with the ExtrudeSrf command. Notice that some of the options allow you to extrude in both directions, as well as adjust the direction of your extrusion.
Closed Polysurfaces
Finally, you can manually create polysurfaces by joining multiple surfaces. When doing so, it is important to get in the habit of making your volumes "watertight." That means - like a closed curve - there are no gaps in your polysurface. This is a good habit to follow in general, but will be very helpful when we generate 2D linework from our 3D geometries. "Watertight" volumes require much less editing in Illustrator.
Editing polysurfaces
These tools will be pivotal for creating your double negative space. We will cover just a few in detail - but you will find many more under "Surface Edit Tools" within the "Surface" menu and "Solid Edit Tools" within the "Solid" menu.
Boolean
Boolean operations will produce new geometry from two given geometries (sound familiar?). There are four different options, but using the Boolean2Objects command (also found under the solid menu) will allow you to select your geometries and then click through the four options. Hit space bar to select an option. Alternatively, if you know exactly what type of boolean operation you want you can type the command in directly.
- BooleanDifference : Subtract the volume of one object from another.
- BooleanIntersection : Create a new solid from a set of objects' intersected volumes.
- BooleanSplit : Split and close objects at intersections.
- BooleanUnion : Combine the volumes of two objects.
For more info on Boolean operations see Workflow:985407
Fillet & Chamfer Surfaces
Just like lines - we can fillet and chamfer surfaces with the FilletSrf and ChamferSrf commands.
