|
Applying Hand Drawn Textures to Rendering |
|
|---|---|
| Screenshot | |
| This workflow builds off of the workflow from Week 4, Creating a Shadow and Linework Rendering, to apply textures specifying materials to the surfaces of the model. Emphasis is placed on creating the hand drawn textures using ink and paper, and using the scans of the texture(s) applied over the surfaces to add more detail and information to a rendering | |
| Uses Tool(s) | Photoshop CS5 |
Methods covered in this workflow:
- Techniques for Hand Rendering Materials
- Scanning High Resolution Images
- Using Transform in Photoshop
- Using Selection Tools in Photoshop
- Using Layer Masks in Photoshop
- Working with Blend Modes in Photoshop
Hand Drawn Texture Rendering
This workflow builds off of Creating a Shadow and Linework Rendering to apply textures specifying materials to the surfaces of the model. Emphasis is placed on creating the hand drawn textures using ink and paper, and using the scans of the texture(s) applied over the surfaces to add more detail and information to a rendering
Steps
Step 1:Creating Hand Drawn Texture
Choosing Material(s) to represent
The first step in this process is to choose which materials in the project that will be represented through hand drawing. The best materials to choose are ones that can be represented using lineweight such as woodgrain, brick, tile, paneling, etc.
Drawing
Once a material is chosen, the proportions and scale of the material must be determined in order to draw the material at scale. An example of scaling a material down would be to draw a plywood material. Being a sheet material, plywood is typically 4-feet wide and 8-feet long. The ratio of 1/2 would be your factor to draw at a smaller scale meaning that a 4-inch wide and 8-inch long rectangle would be the correct scale at 1"=1'-0". The grain of wood then drawn within the 4"x8" rectangle would then need to be proportional to that scale, holding enough detail to be represented clearly in a rendering.
Scanning
Once the chosen materials have been hand drawn, they need to be scanned for use in Photoshop. Using a flatbed scanner, scan the images at a high resolution (600dpi or higher) in order to allow for the texture to be scaled up or down and retain its image quality.
Editing
Once scanned, bring the texture into Photoshop. The scanned hand drawing will need to be cropped, and adjusted using a black and white adjustments layer in order to remove any color cast that may have been added through the scanning process. Selecting the crop tool from the left hand toolbar, set the custom proportion to the size of the surface, or the size/ratio of the material. Here, it is set to 8x4 to represent the wood grain of a panel of plywood.
Once your image has been cropped, add an adjustments layer from the bottom right toolbar below the layers pallet (small half white and black circle) choosing black and white . This step will remove any color that may have been added in the scanning process.
Save the texture as a .PSD file once finished.
Step 2: Applying Texture to Rendering
Place Texture into Rendering File
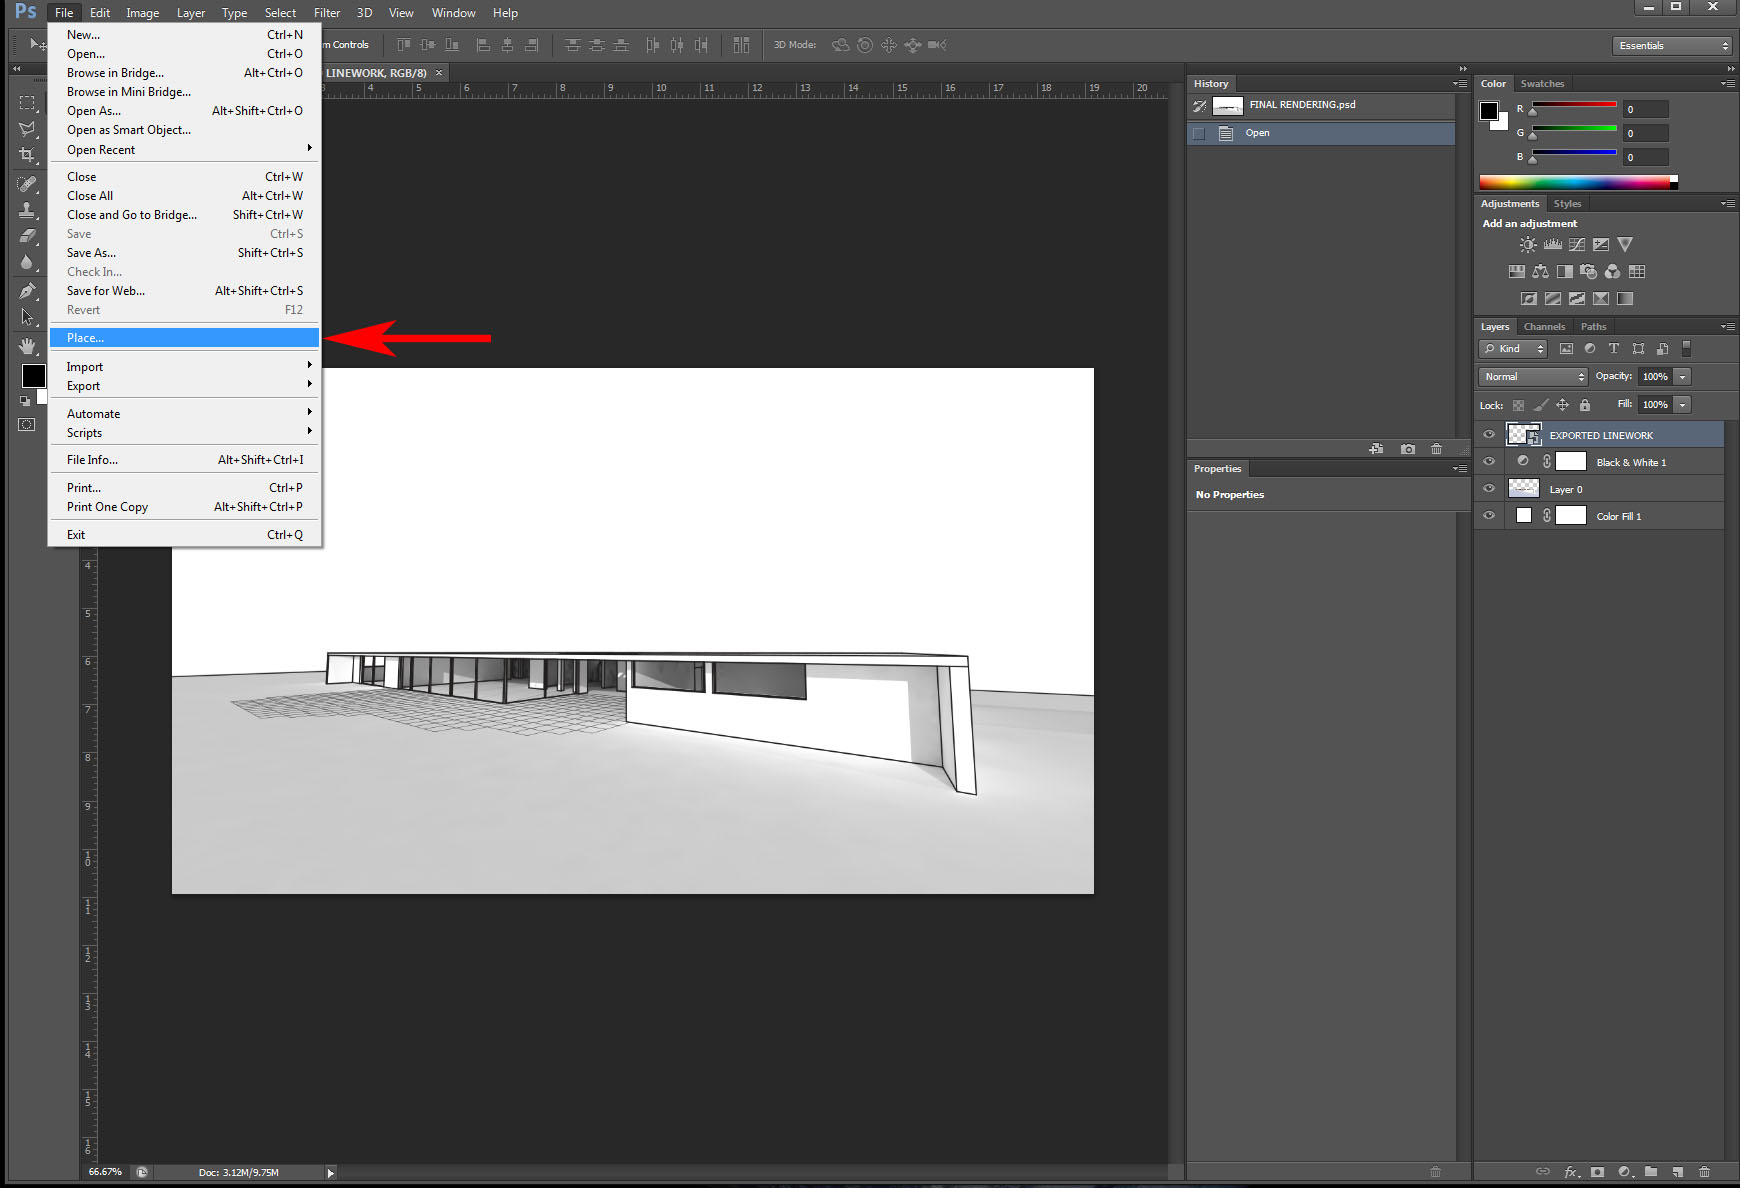
With the rendering that will have texture applied to it open in Photoshop, the texture file can now be placed into it. Selecting file > place choose the .PSD file previously saved of the scanned and edited texture.
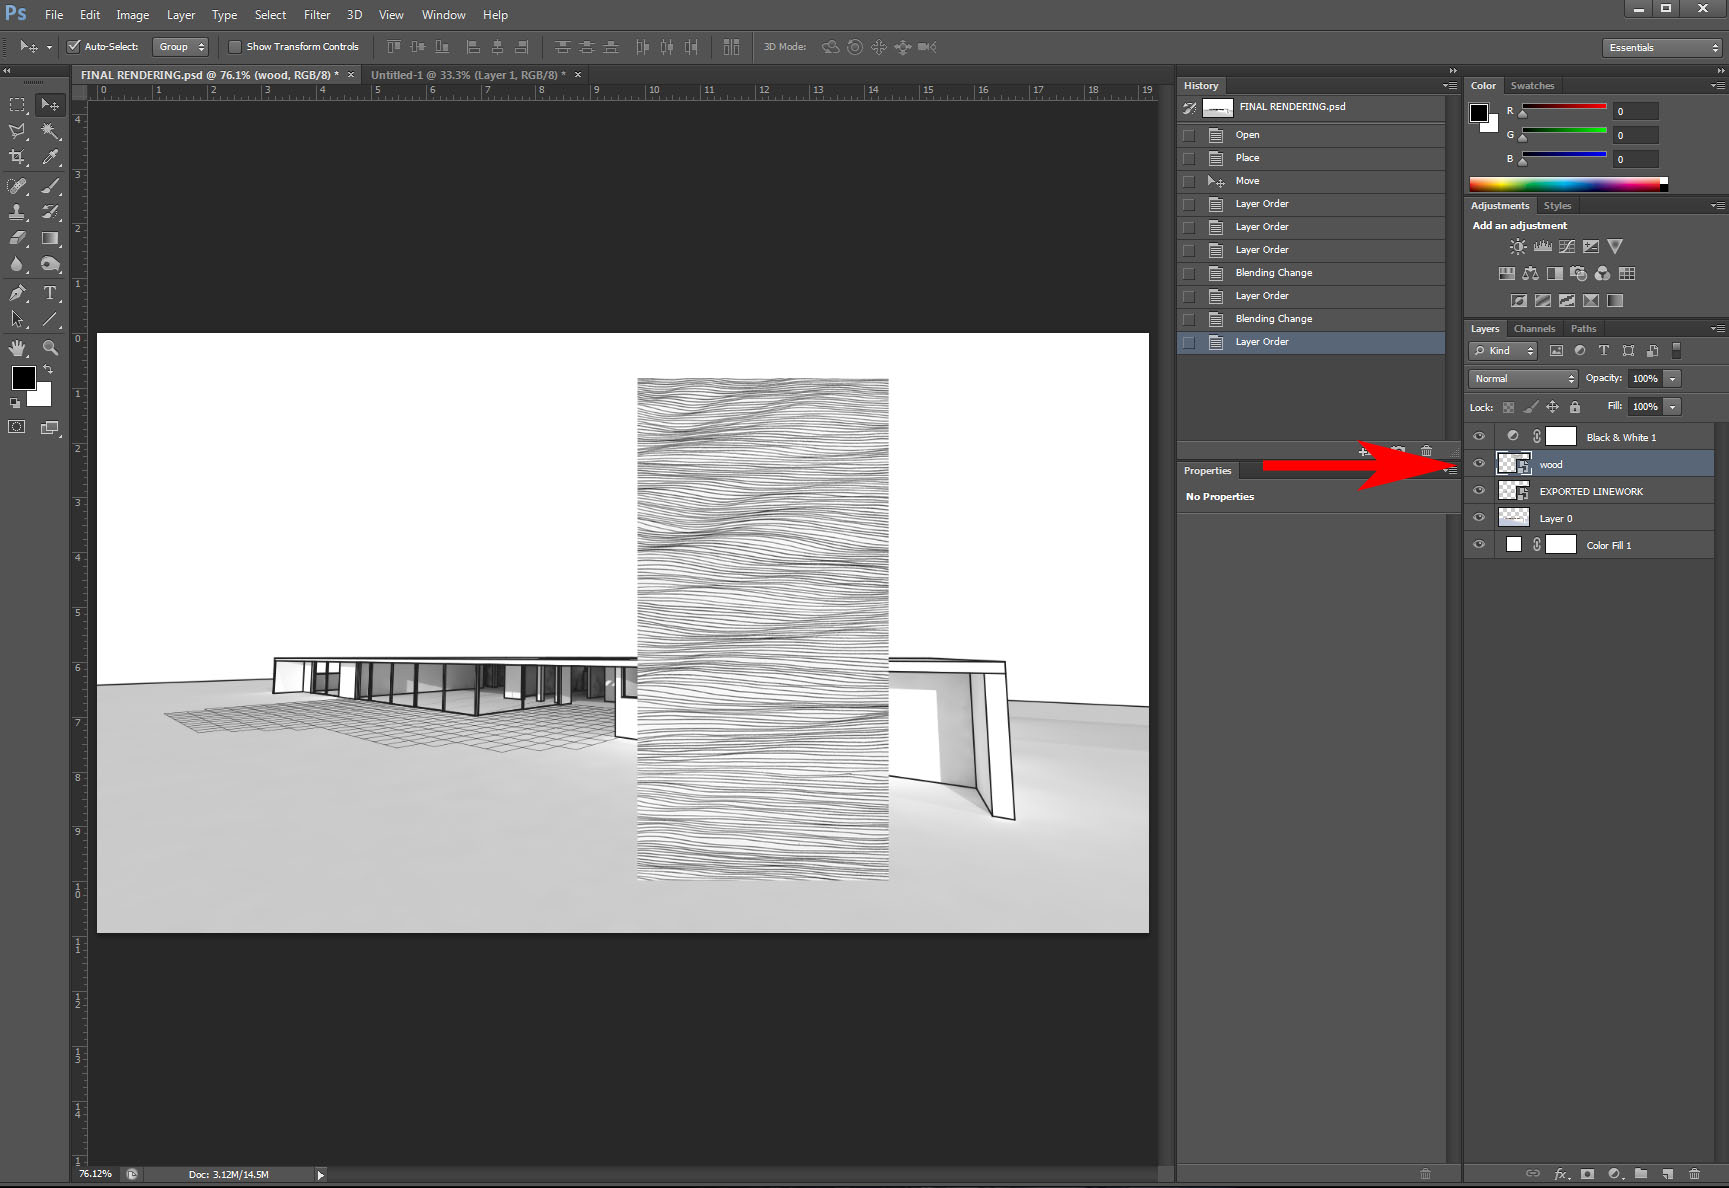
Once the texture is in the same Photoshop document as the rendering, hit the return key to place the image. Be sure to take care that the texture layer is above the layer that the rendering is on, otherwise the texture will be hidden by that layer.
Before moving forward, the layer that contains the hand drawn image must be rasterized before moving forward. Right click on the layer containing the hand drawn texture and choose rasterize layer from the drop-down menu. This will allow for more comprehensive editing of the image in Photoshop.
- tip - Photoshop layers work hierarchically, any layer that lies another layer effects the layers below it.
Scale
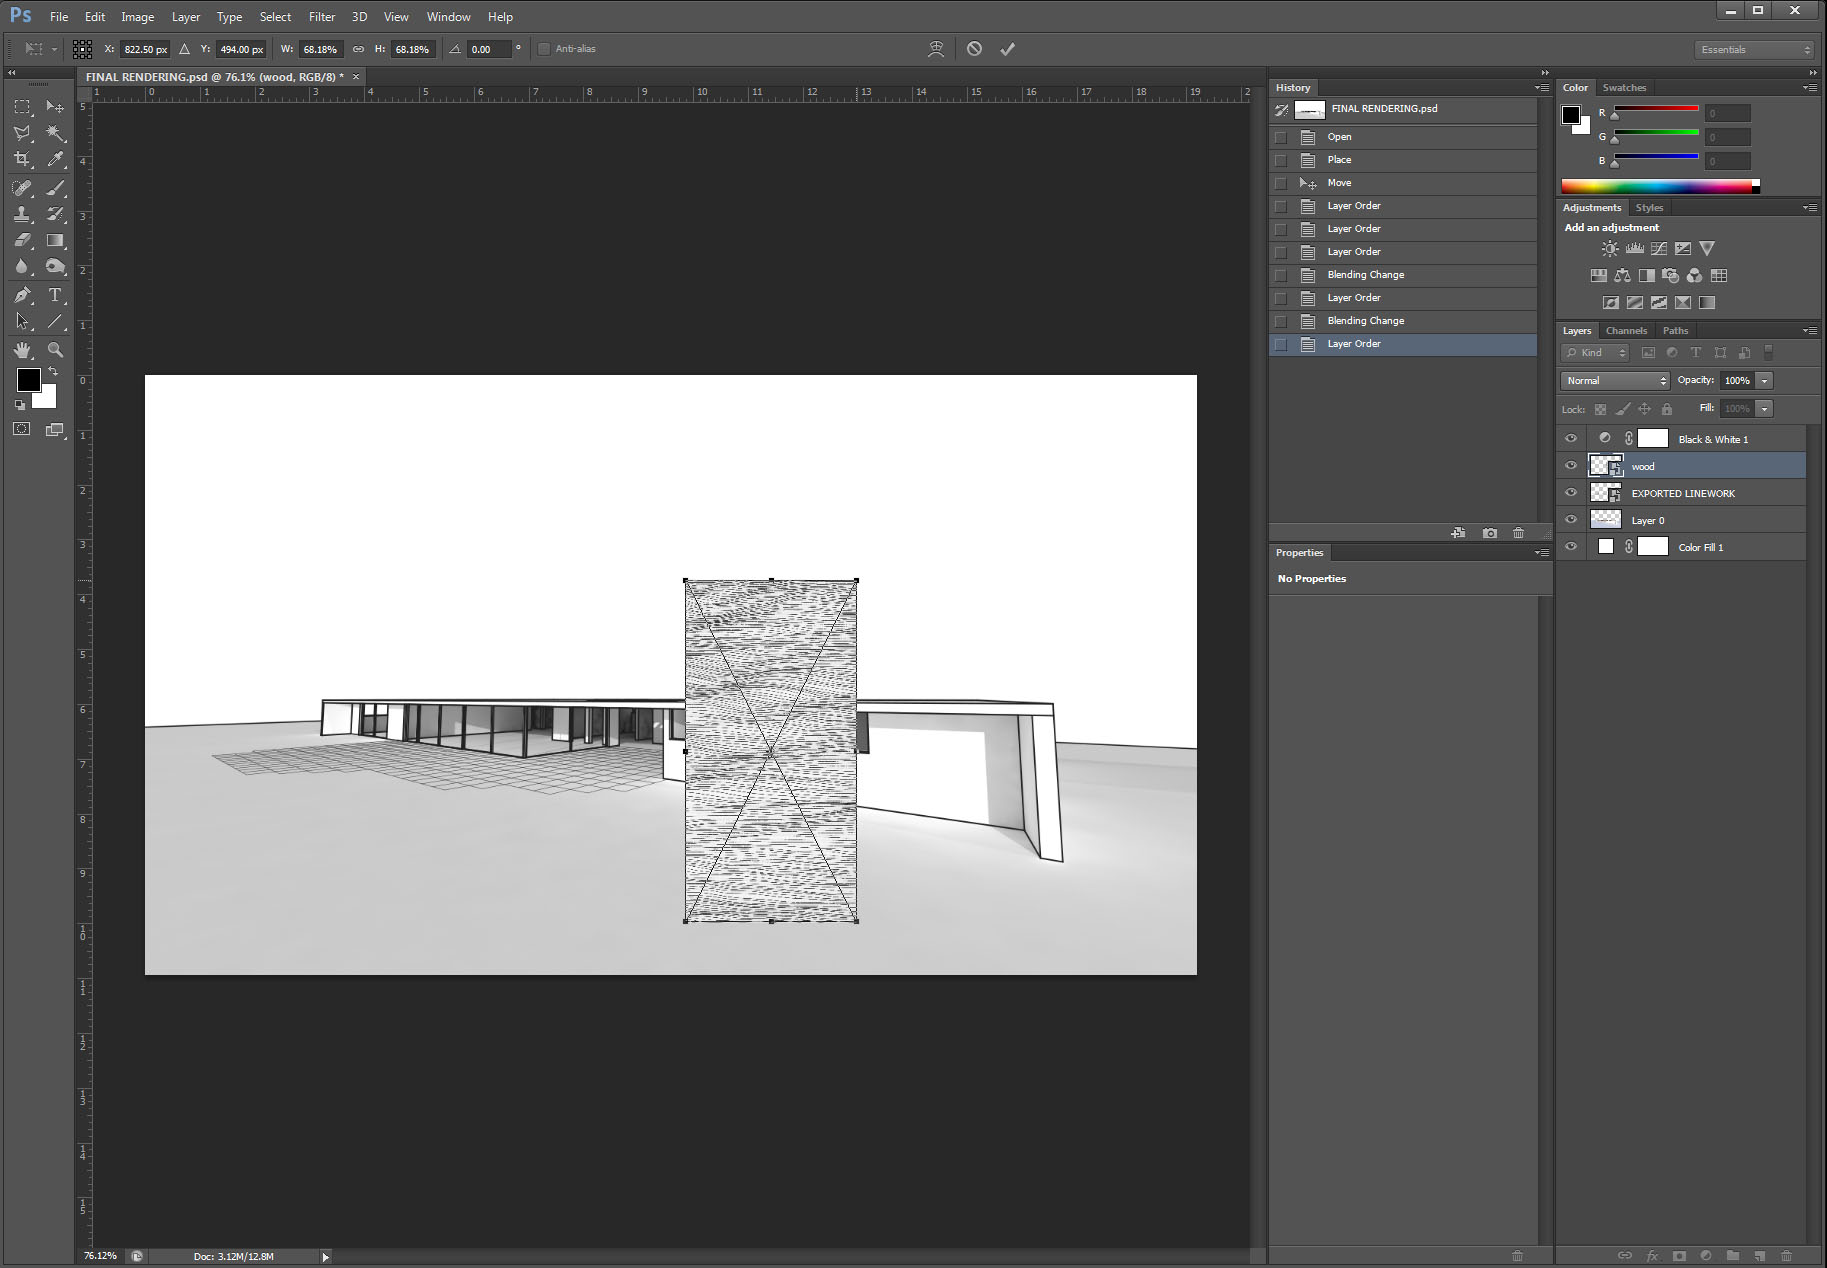
Due to the higher resolution that the drawing was scanned at, it may be placed into the rendering document quite large. Use the transform command ctrl + T for PC and command + T for Mac to scale the image. Grabbing one of the corners and holding down shift, the image can be scaled proportionally to closely fit the scale of the surface it will be applied to.
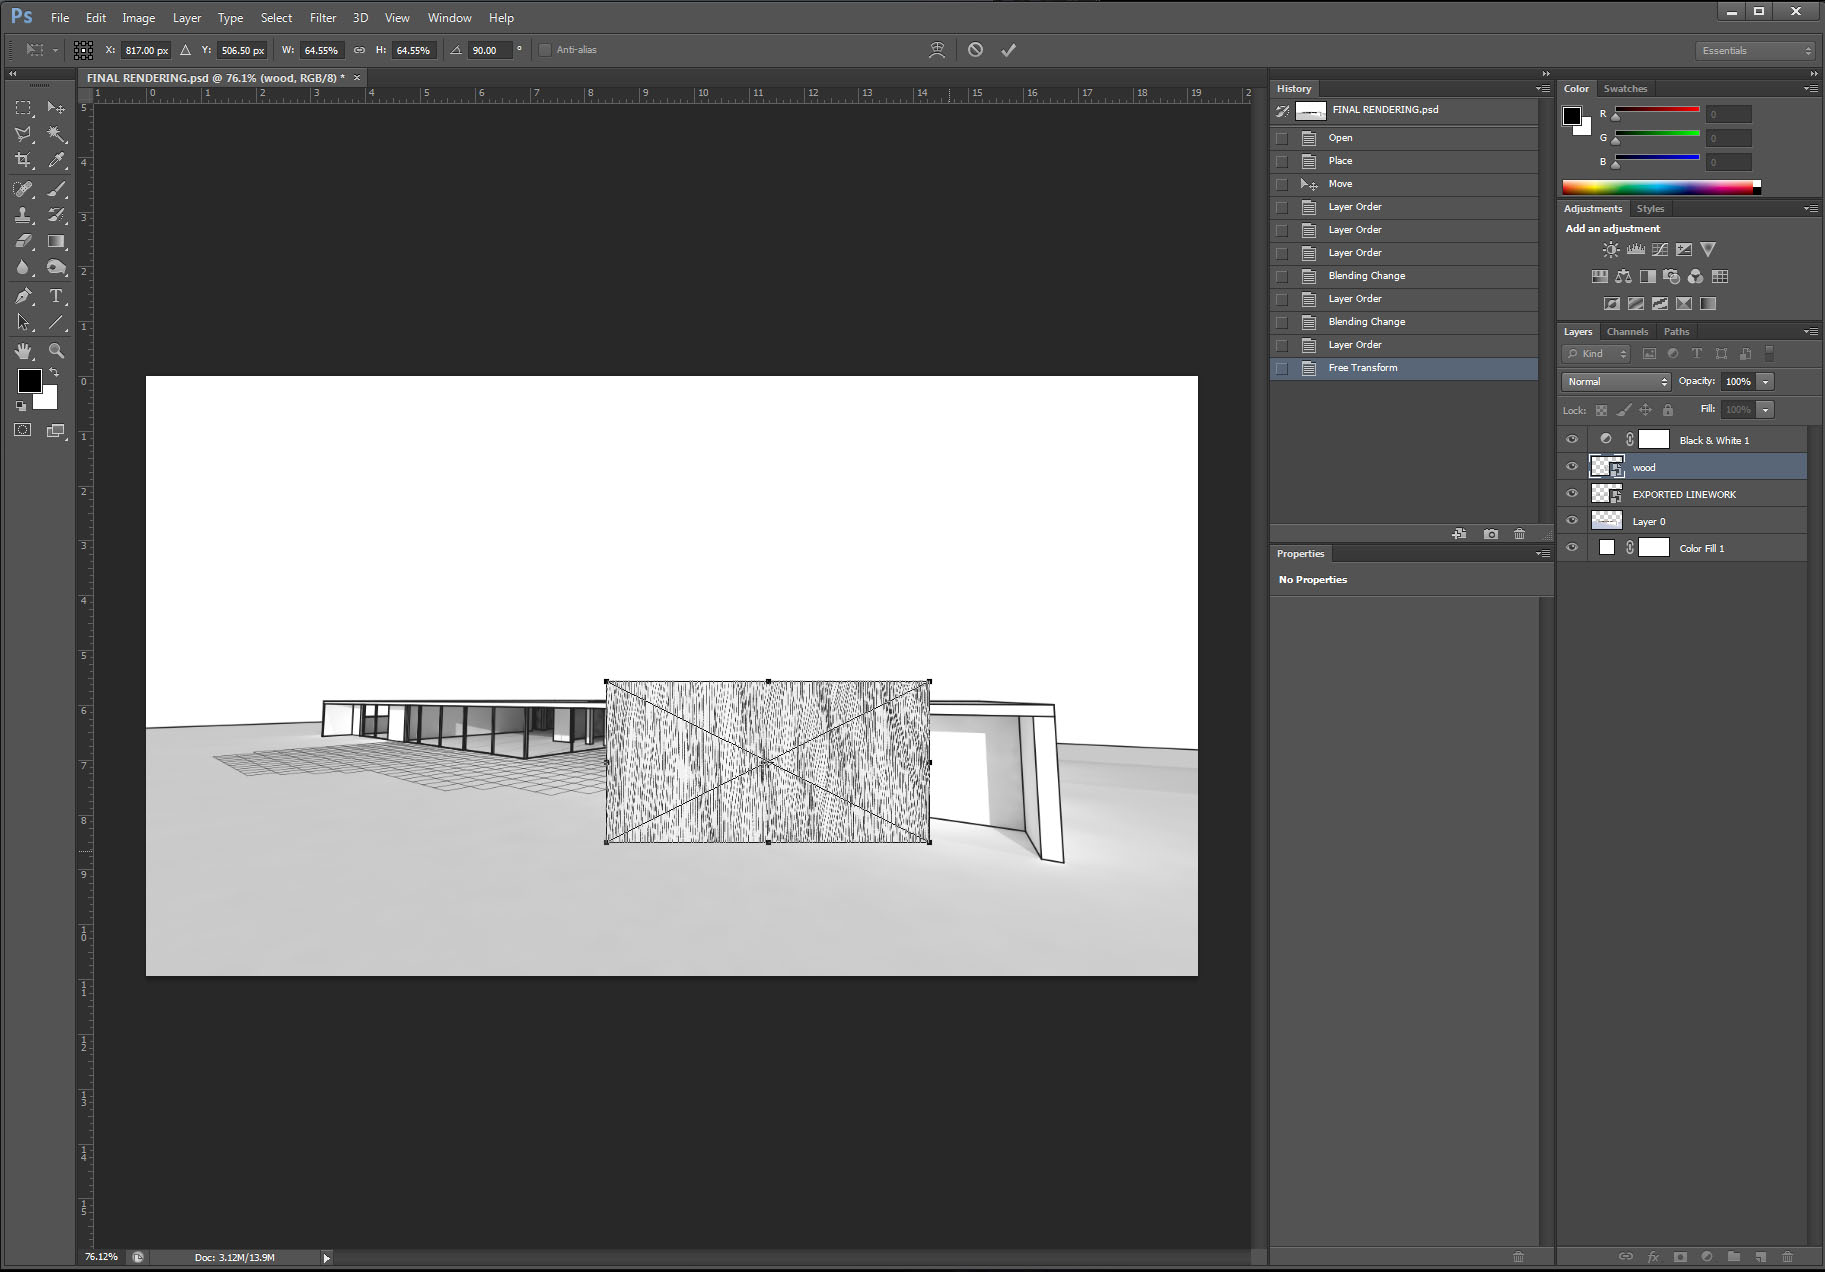
The transform command can also be used if the image needs to be rotated. Entering the command for transform again, hold the cursor just outside of one of the transform corners until a small bent selection arrow appears. Holding down shift and rotating, the image can be rotated in fifteen degree increments. Releasing the shift key while rotating allows for a less precise rotation.
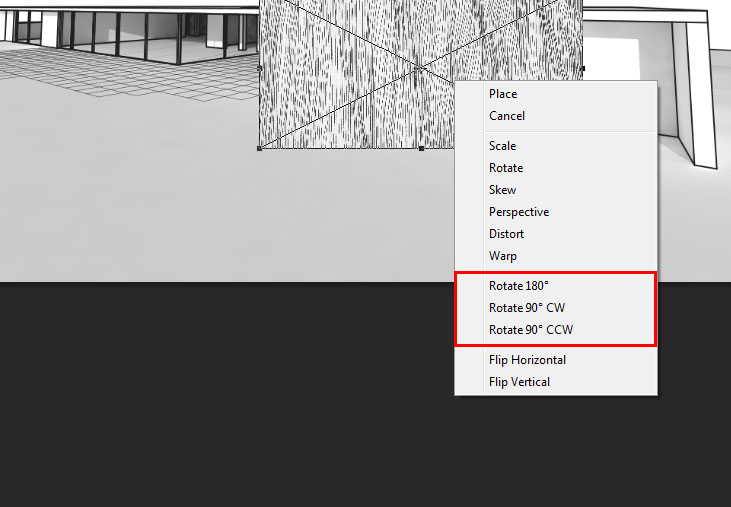
Another way to rotate is to right click on the image while in the transform command and using the rotate 90 degrees clockwise, counterclockwise, and rotate 180 degree options in the drop-down menu.
Transform
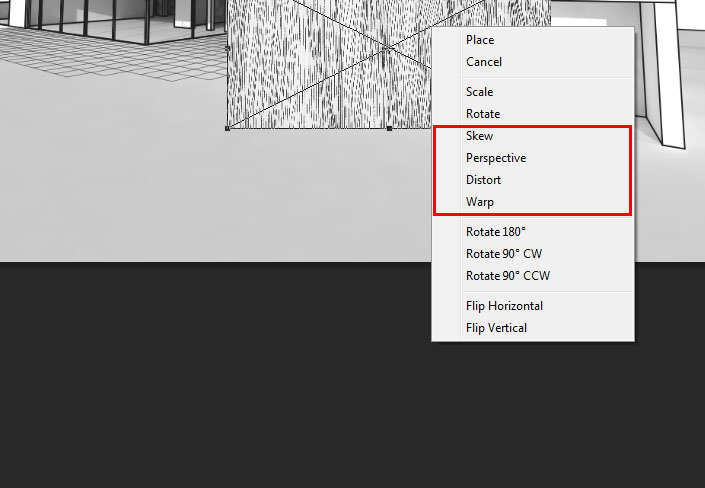
The transform command not only allows you to scale the images that are within a Photoshop document, but also allows the images to be warped and distorted. Using perspective and distort the texture layer can be manipulated to better fit the perspective of the rendering it will be applied to. Experiment with making the texture recede to different vanishing points using perspective transformations, and use distort for final adjustments.
You can also change the opacity of the texture layer to better see how it is aligning to the surface onto which it will be applied. Here, the opacity has been lowered to 50% in order to see the rendering and linework beneath it.
Once transformed, press the return key to finalize the transformations. The opacity can also be returned to its original 100%.
Step 3: Layer Masks
Using layer masks allows for the control of the transparency of the layer the mask is applied to. Using layer masks is a non destructive way to edit, masking parts of a particular layer rather than deleting it.
Selecting Area to be Masked
To begin the process of using a layer mask on the texture, fitting it perfectly to the boundaries of the surface it is to be applied to, the surface must be selected. Because this rendering is using linework to also define the boundary edges of a surface, the magic wand selection tool can be used to select the white area inside of the linework.
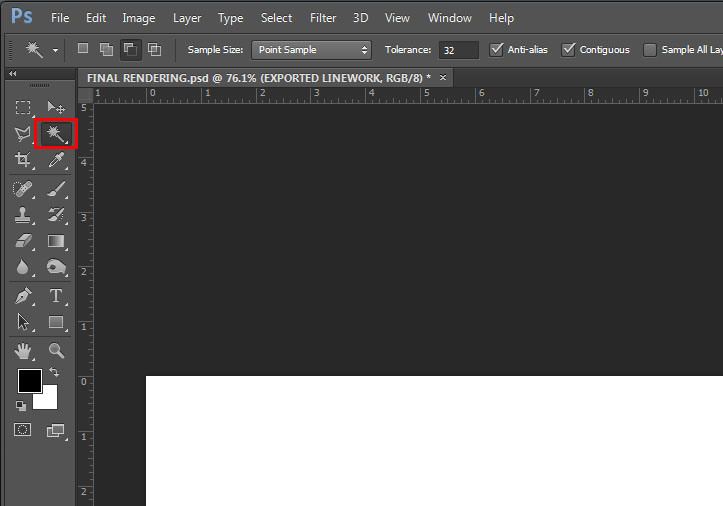
Select the layer that the linework is on so that it is the layer that is actively being edited. Using the magic wand tool (as seen above in the toolbar) select the area between linework that defines the boundary of the surface onto which the texture will be applied. Once the area is selected, marching dashed lines will define the selection boundary.
Applying Layer Mask
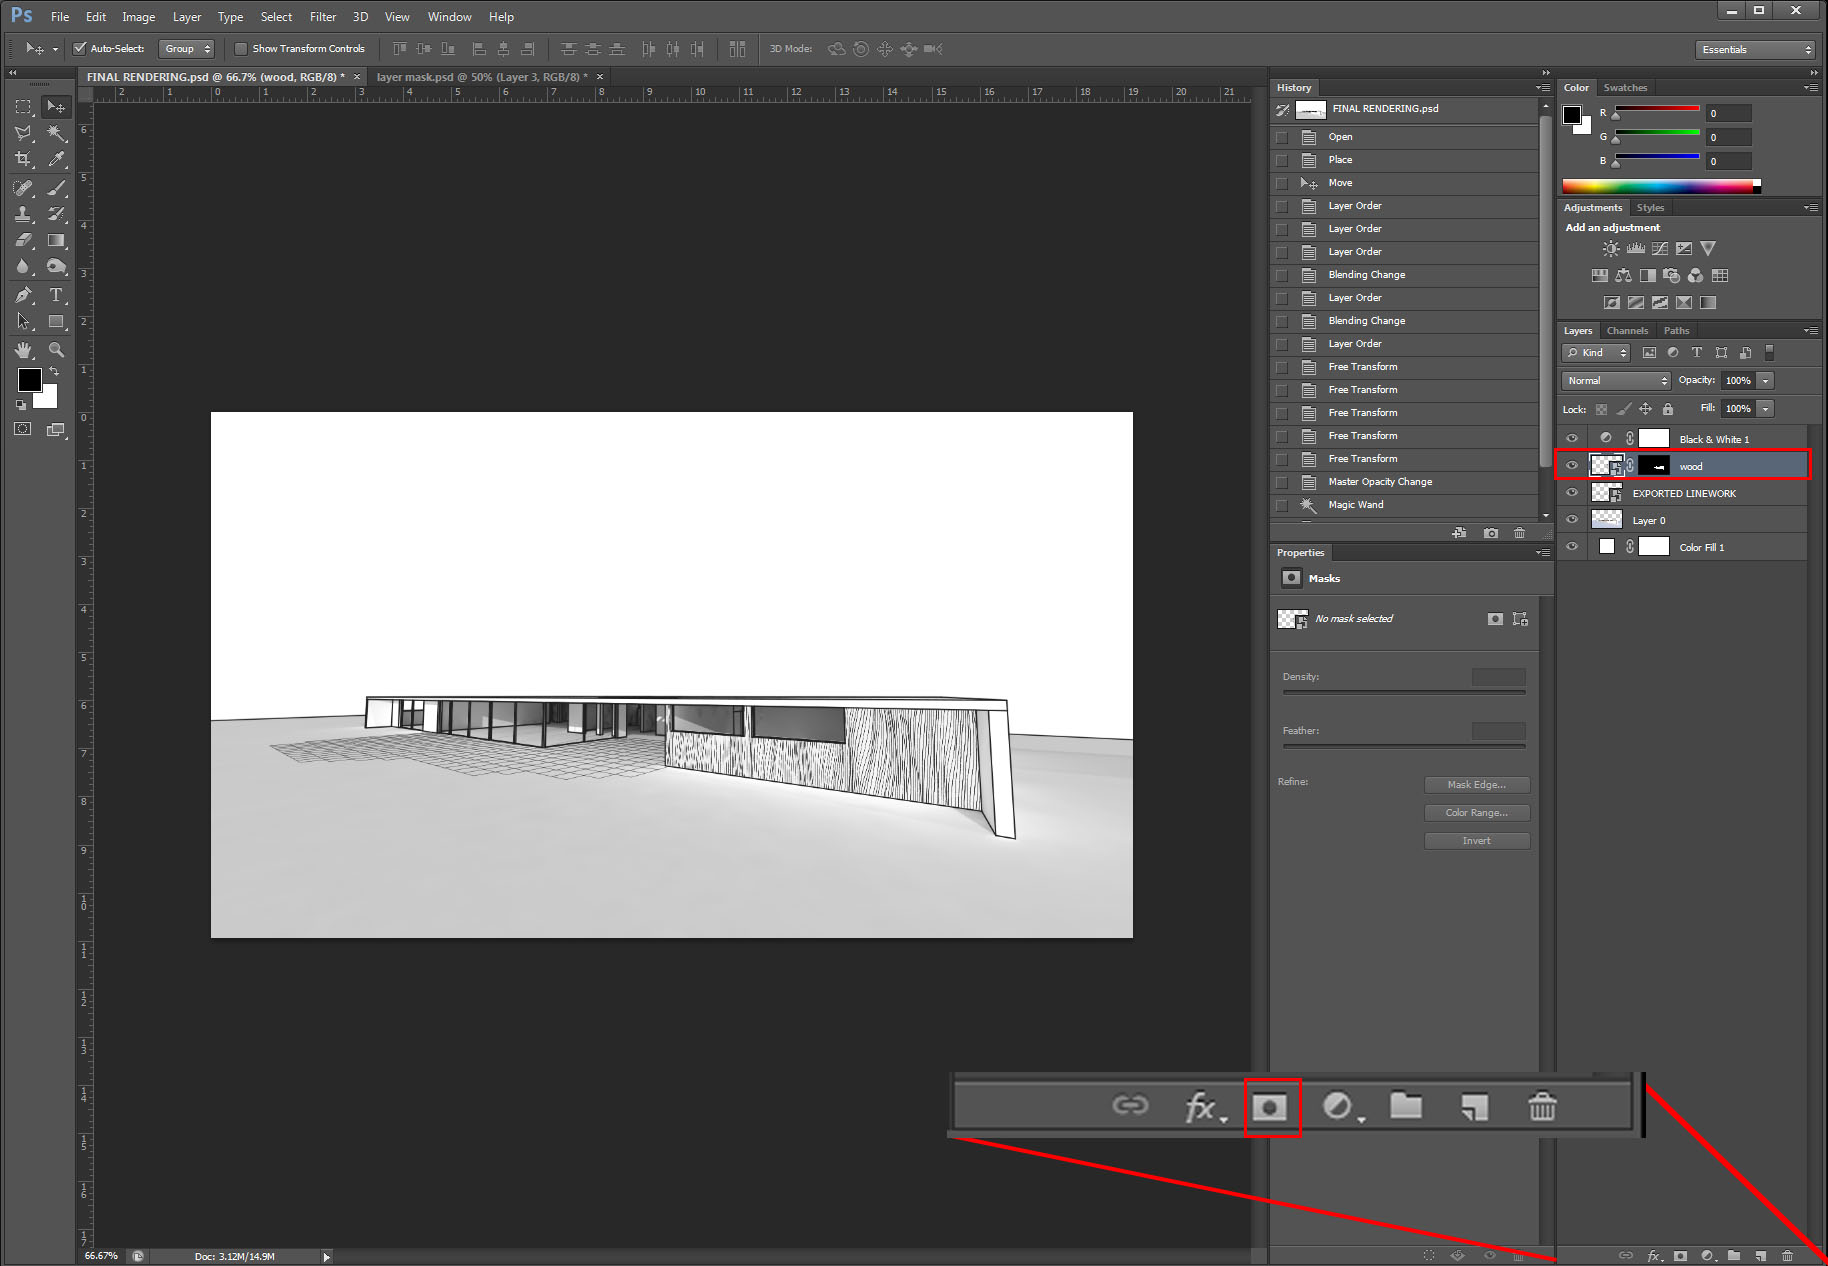
Now, selecting the layer which contains the texture, the layer mask can be applied. With the texture layer highlighted, click on the layer mask icon in the bottom right hand toolbar (white rectangle with a black circle). Once selected the layer mask will mask away everything outside of the selection boundary, perfectly cropping the texture to the surface.
Continue applying texture(s) to the appropriate surfaces using the previous method with layer masks until complete.
- tip - When using layer masks, the tone of black/gray used is very important. Black will render a mask completely opaque (hiding whatever is on the layer) and a white layer mask will reveal everything on that layer. When using layer masks and the brush tool to hide/reveal moments on a layer be sure that the layer mask is what you are painting on. To be sure the layer mask is selected, make sure that the rectangle has four white corners highlighting that the layer mask is what is being edited.
Using Blending Modes
Using the opacity slider the transparency of the information on a layer can be changed from completely opaque to translucent. Although this can be useful in some applications, it renders all of the information on the effected layer the same. Blending modes use mathematical operations in Photoshop to blend layers based on tone and other information. The use of blending modes will allow the texture to still be legible, but also allow the shadow information of the rendering to read through and effect the texture as well.
Select Layers to Apply Blend
In the layers palette, select all of the texture layers that will have a blend mode applied to them. Holding down shift while selecting will allow multiple layers to be selected at once.
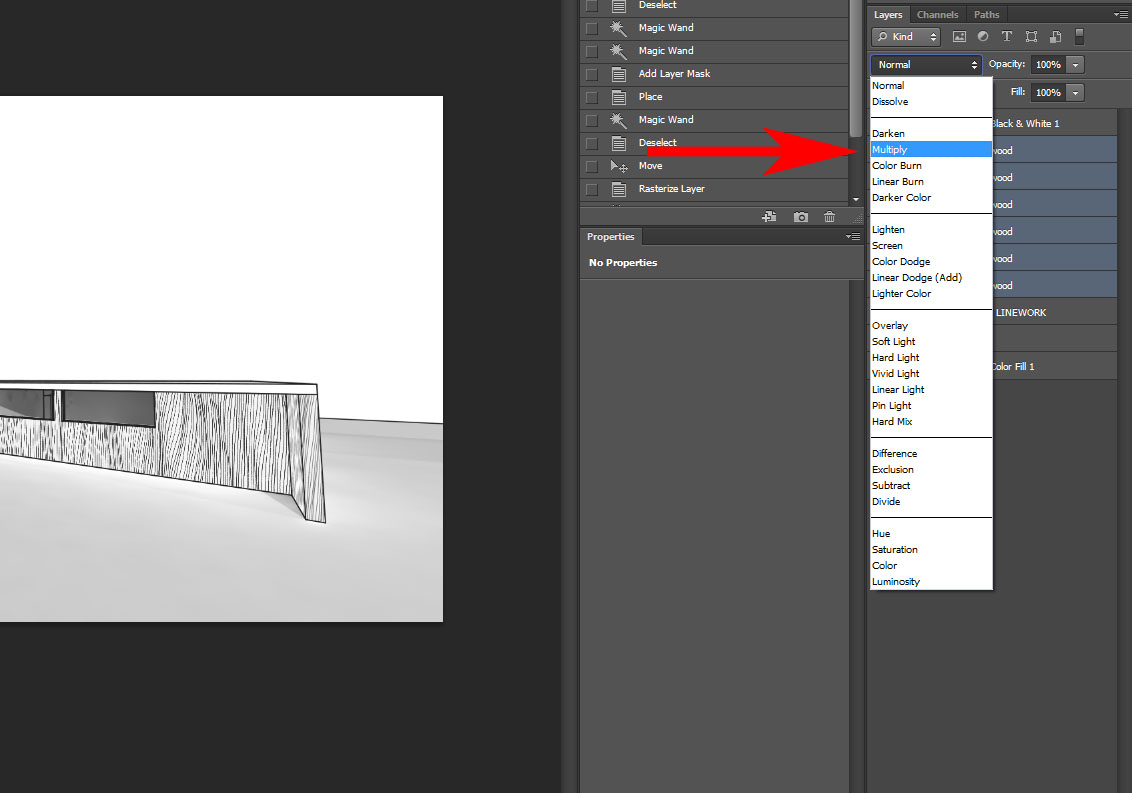
Multiply
Due to the nature of the rendering at hand, the blend mode Multiply will allow for the white of the hand drawn texture to fade away and become translucent. This will then allow for the shadows of the render layer beneath to show and add depth to the rendering. These shadows layers will read as effecting the texture layer as well, emphasizing that the texture is part of the surface.
In the blend modes drop-down menu (left of the opacity slider above the layers palette) choose Multiply from the list of options with the texture layers selected.
Once applied, the shadows of the rendering layer below will become visible again.
Step 3: Save
Save as .PSD
Once all of the applicable textures have been applied to the rendering, save the final image as a .PSD file to retain all of the editing capabilities. From here, the file can also be saved as a JPEG to add to presentation documents.


