|
Creating a 2pt Perspective Hand Drawing |
|
|---|---|
| Screenshot | |
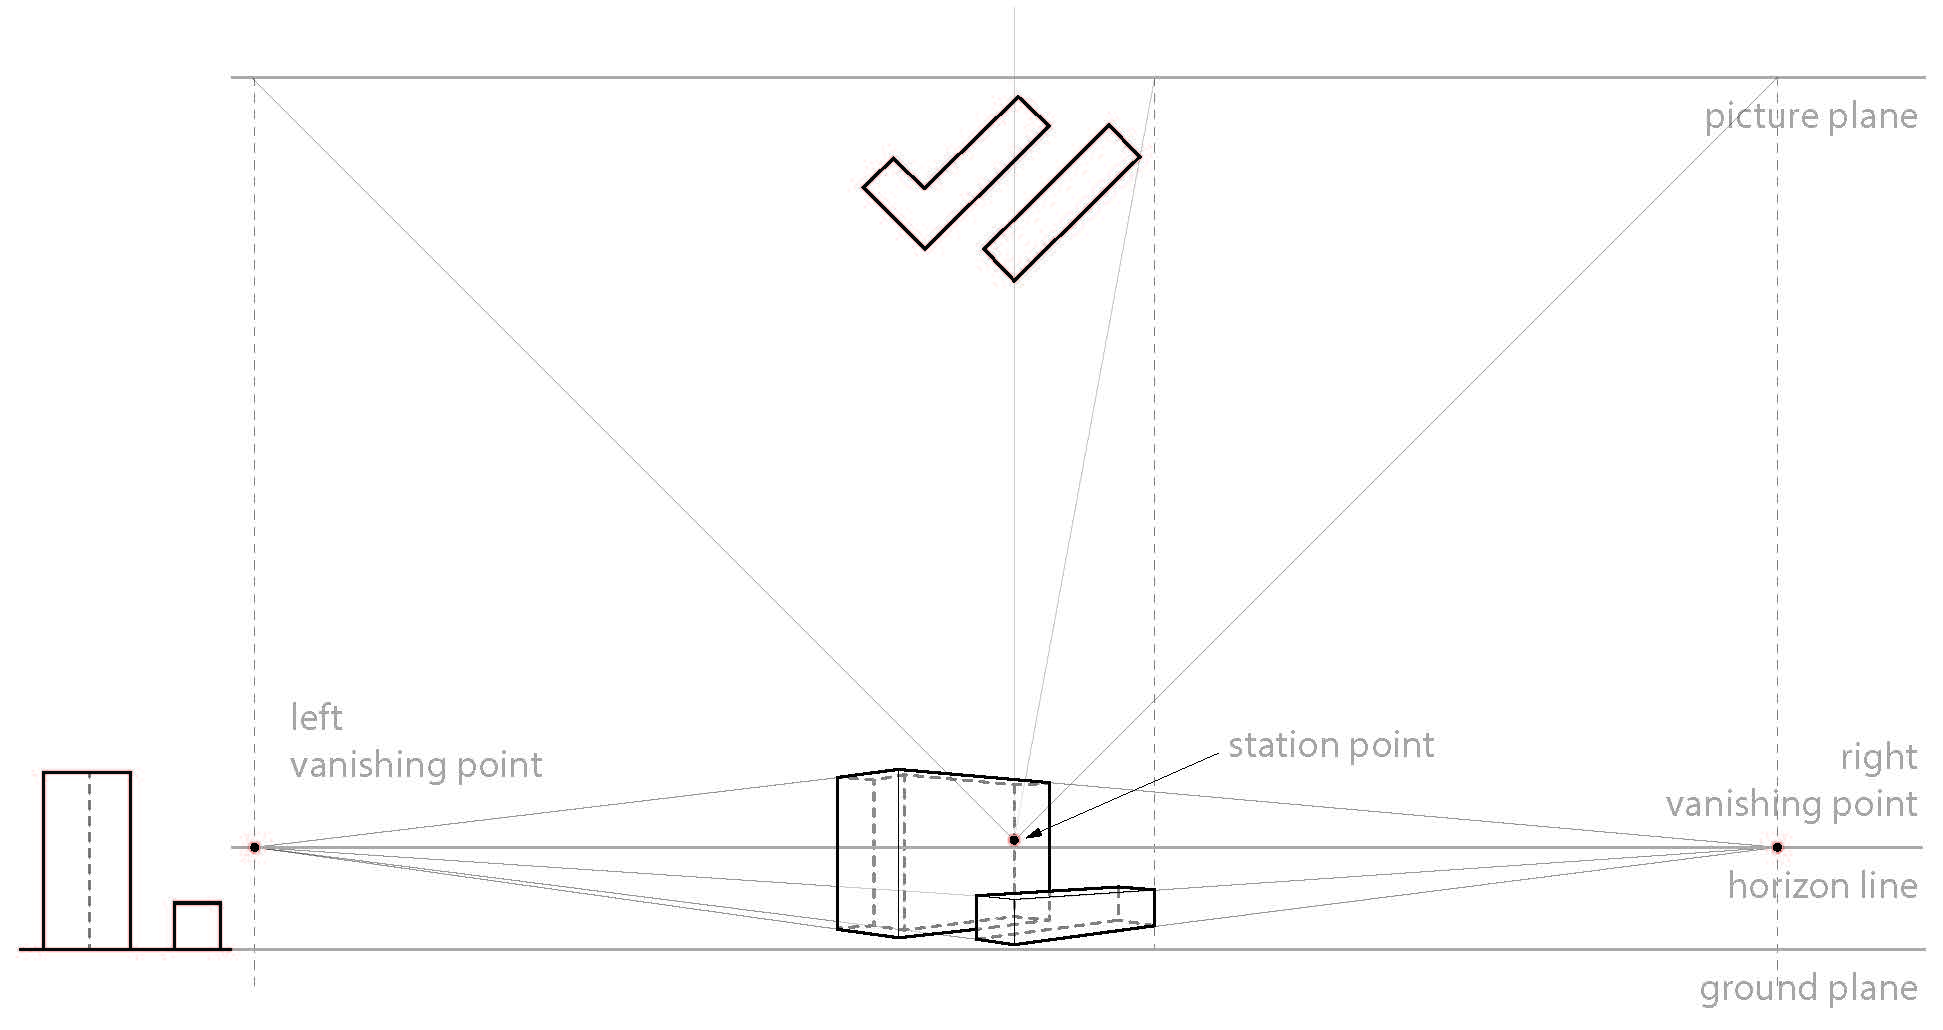
| This workflow will walk you through how to create a 2pt perspective by hand. Understanding that a tacit intimacy with your work can arise out of hand drawing and can serve the development of anything from details to larger formal manipulations, the 2pt perspective provides an added means to facilitate this development, over and above the sketch or orthographic drawing. A plan and an elevation will used to represent a measured design rather than a sketch in the workflow. | |
| Uses Tool(s) | Drafting Board |
When projecting objects in 2pt perspective, we can reveal aspects of the design that orthographic projection cannot facilitate. Akin to a rendering, the 2pt perspective will serve to pull our view back into space, allowing for a variety of 3d vantage points that can aid in represented a design.
Note
- This workflow is mostly correct. However, the placement of the picture plane would necessitate the initial height measurement to be calculated differently. Please see [this workflow] for the way to properly draw this height.
Initial Setup
Tools
The tools needed to complete this workflow will include:
- Drafting surface
- Graphite pencil(s)
- Trace paper
- Drafting Dots
- Mayline or t-square
- Drafting triangle
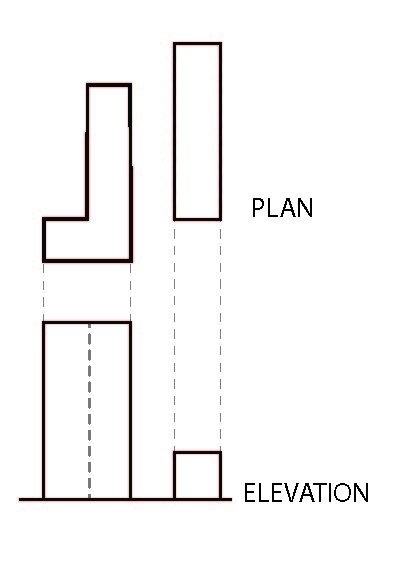
Before you can begin making your 2pt perspective drawing, you'll need to make sure you've prepared a site plan and a front elevation of your design. The scale of your plan and elevation will dictate the size of your perspective. The below example is using a 4 square inch plan (2.5" x 2") and the necessary space for the perspective drawing was about 11"x17", so if your plan is big, the space needed on your drafting surface will be much larger. Take this into consideration when preparing your plan and elevation.
STEPS
Picture Plane, Plan, and Station Point
Setting up the Picture Plane
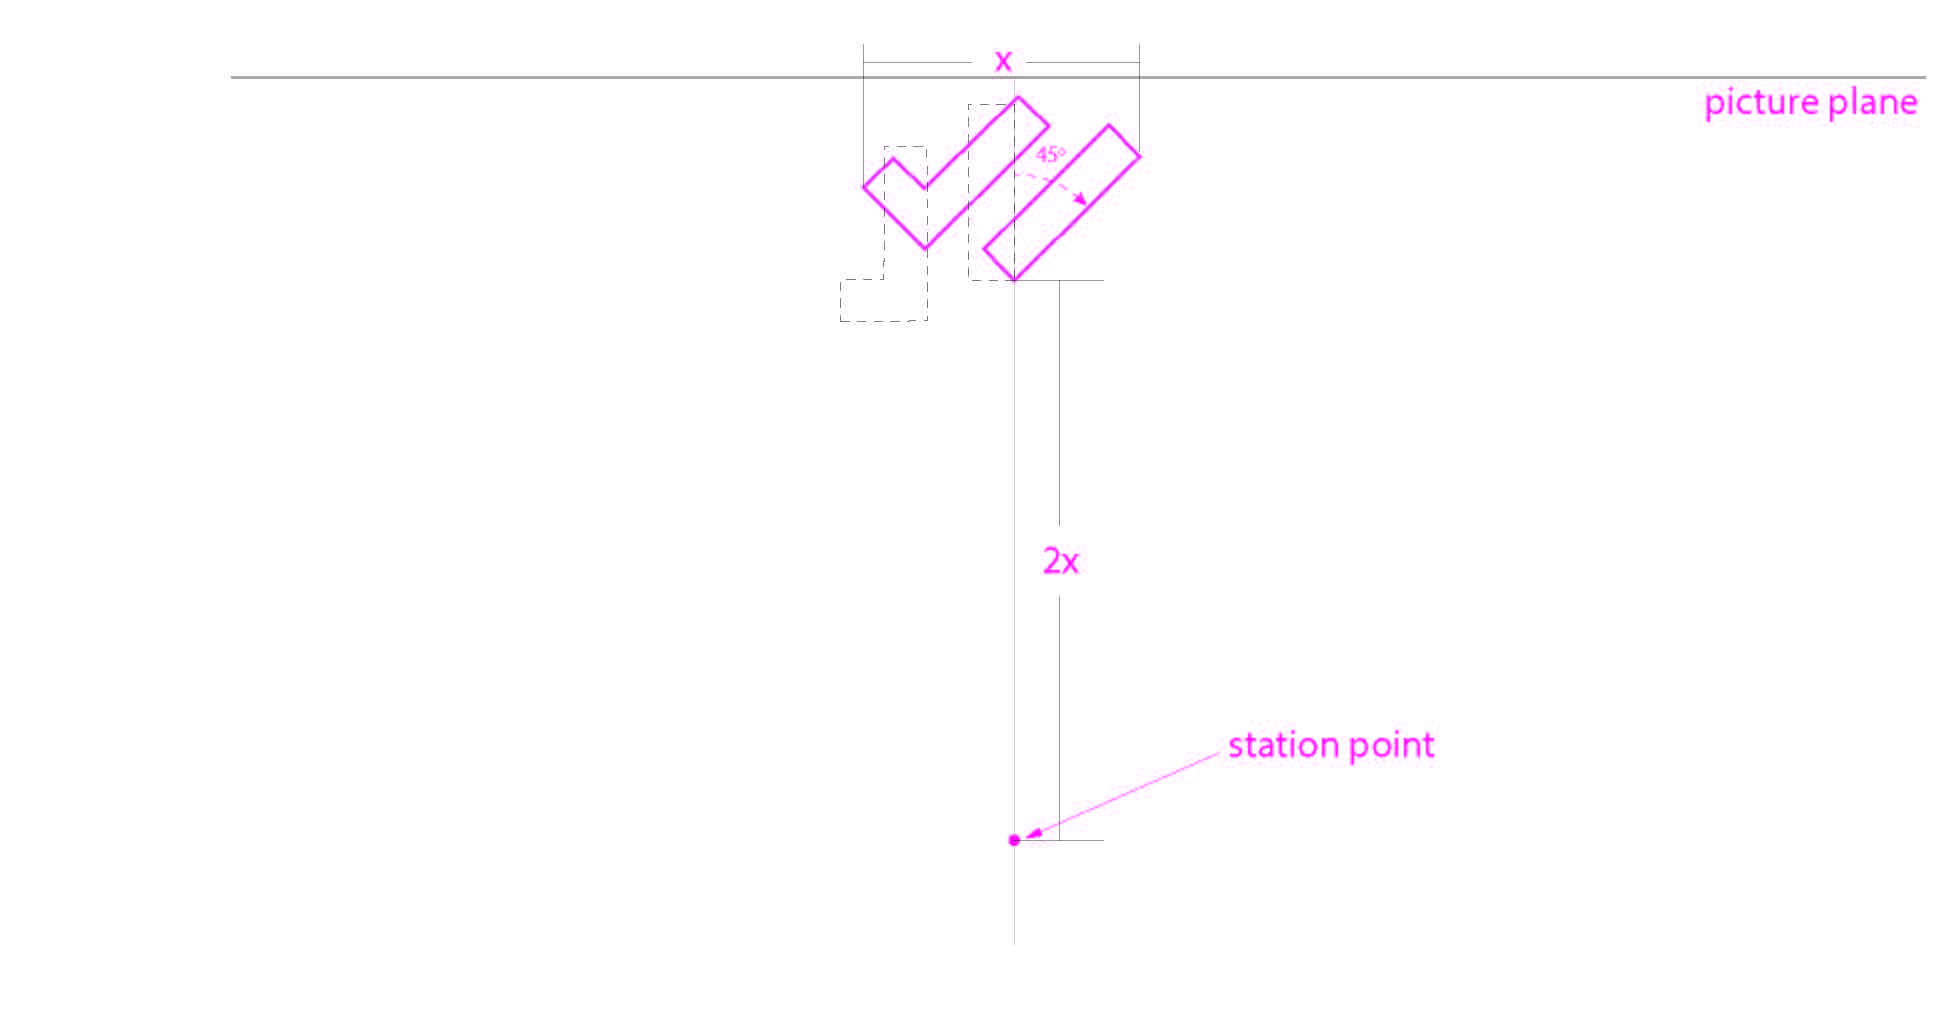
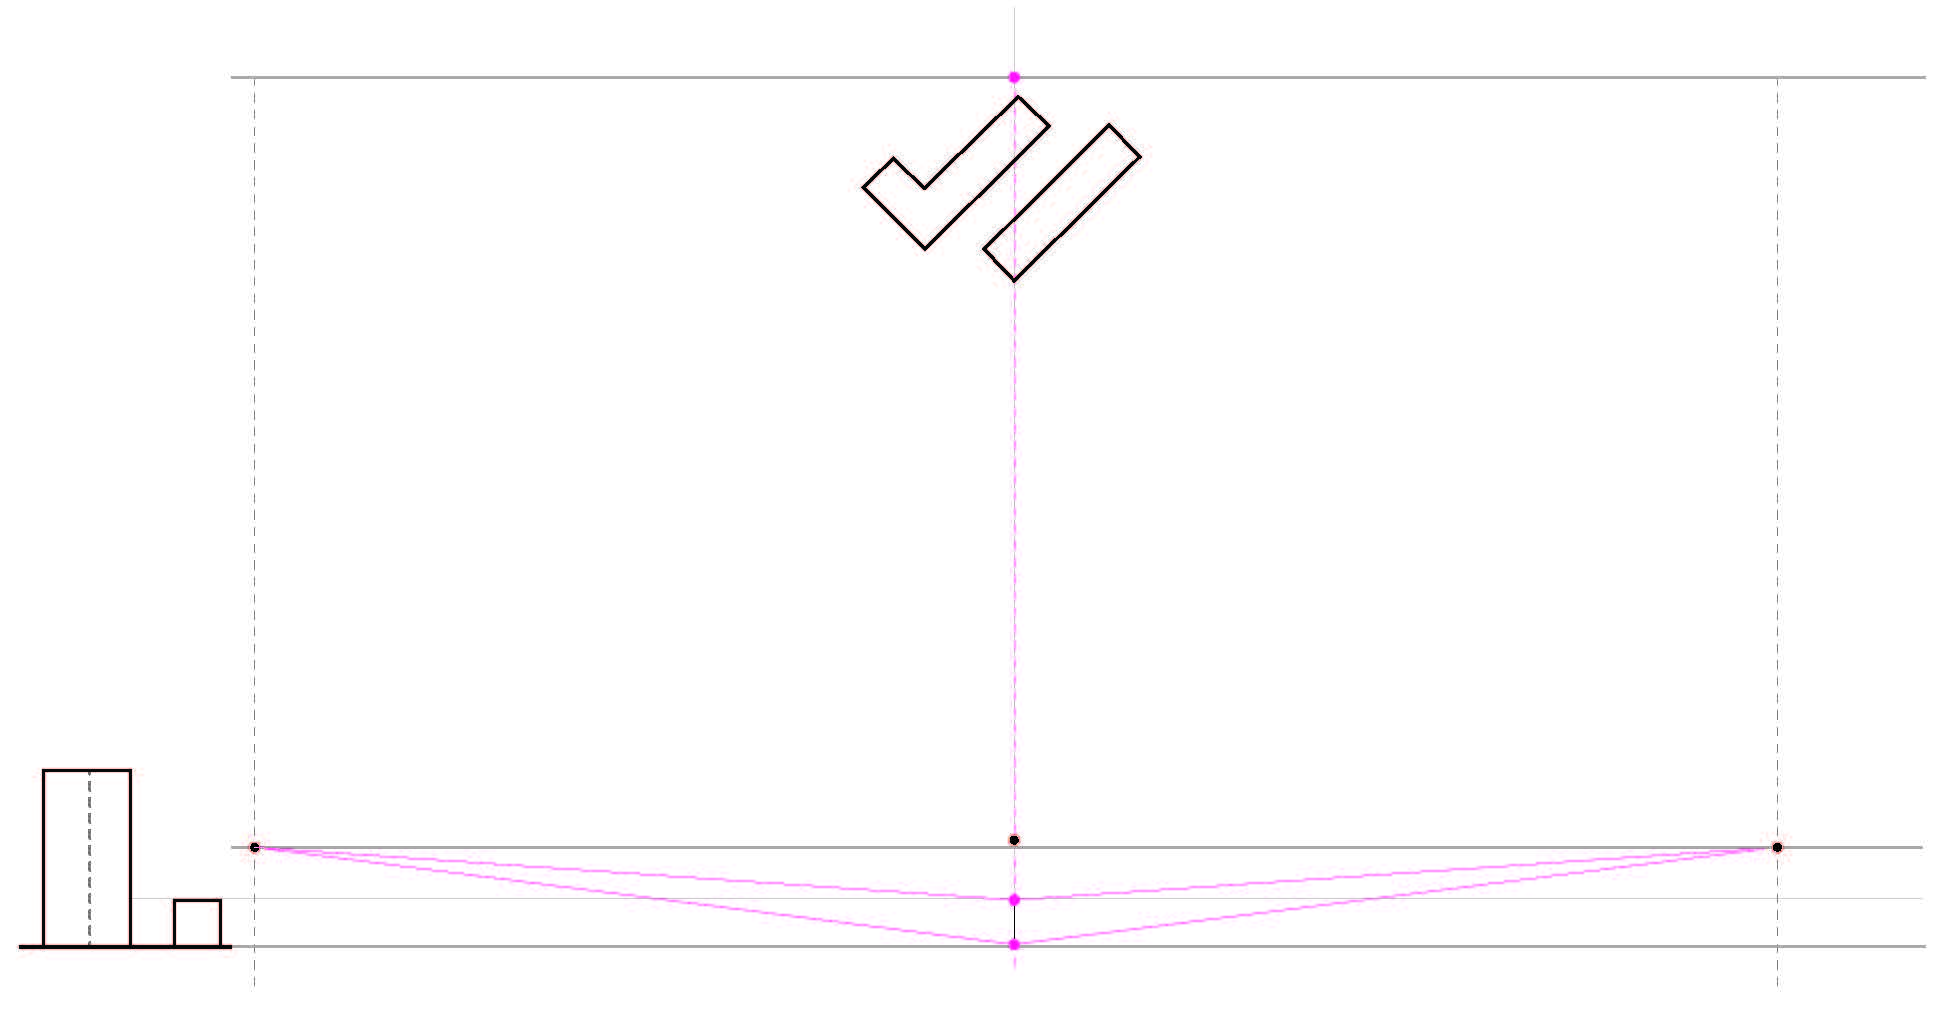
Once you've put down a layer of trace paper held down on each corner with your drafting dots, you're ready to lay down the picture plane. the picture plane is a single line that, when paired with your station point, will establish a "cone of vision" for your perspective. Placing it above your plan will create a longer cone of vision, while placing it below your plan will create a shorter cone of vision. I decided that I wanted my cone of vision to be slightly larger, and therefore placed my picture plane at the top of my base layer of trace.
Placing your Plan
After the picture plane is in place, deciding where your perspective is centered comes next. This can be directly in the middle of your board or to the side. In this workflow, I've simple decided on the midpoint of my picture plane and draw a station line down. I then pulled in my plan, picked a point that I wanted to be the most prominent, and begun rotating it to decide what faces I wanted to showcase in the perspective. How you rotate your plan will allow you to key into the most interesting parts or subject(s) of your design. For the sake of simplicity, once again, I went with a 45 degree, clockwise angle.
Finding your Station Point
The station point establishes your cone of vision with your picture plane and can have dramatic effects on your 2pt perspective. A good rule of thumb is to establish the furthest point on your rotated plan to the left and to the right, project those lines to the picture plane and measure that distance (X). Then, double that distance (2X), move to your lowest, most prominent point and move down that doubled distance (2X). This will help ensure that your perspective lens is not overly "blown out" or warped. However, if you are interested in that effect, try it out and see if it suits your needs.
Video Tutorial 1:
Adding Vanishing Points
Ground Plane
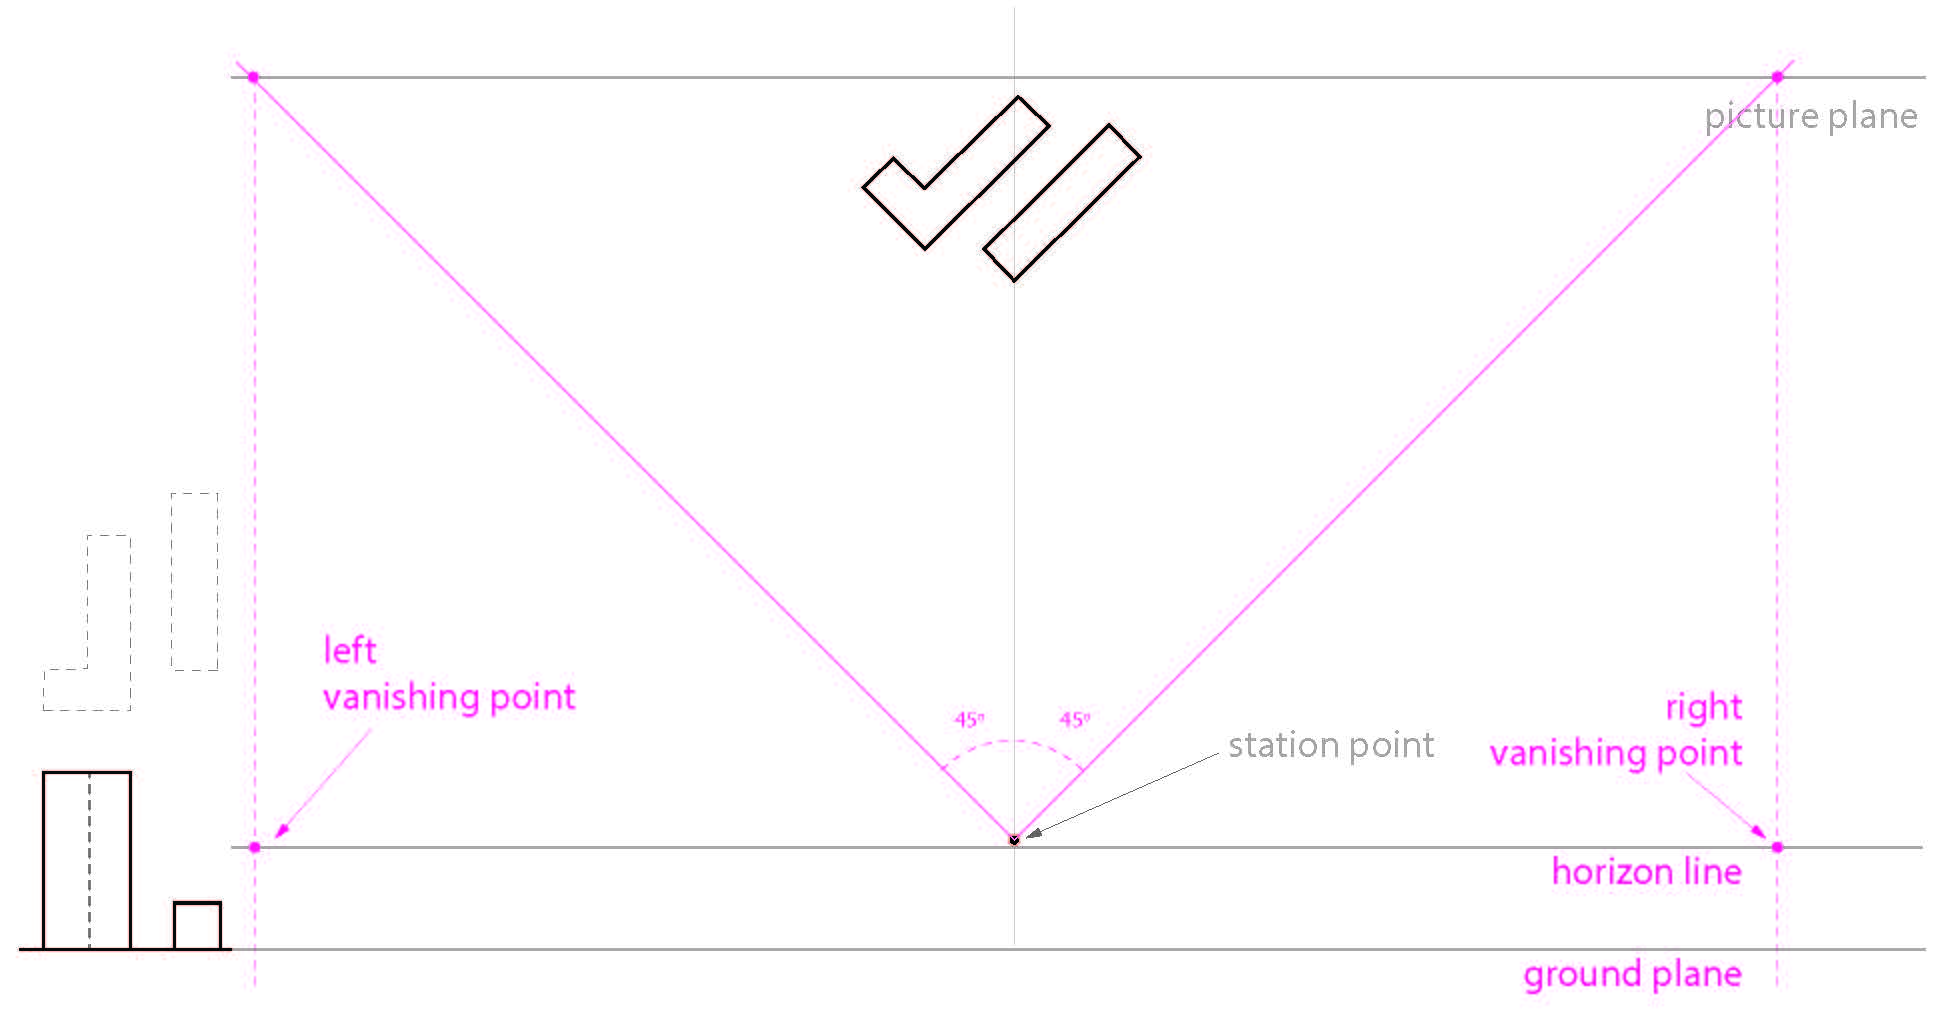
Your vanishing points are always located on the horizon line, which will establish your vantage point above, below, or centered on an object, but the horizon line only makes sense when paired with a ground plane. If you wish to place your design on the ground, the ground line will always be below the horizon line. If you wish to "float" your design, the ground plane must be pulled above the horizon line, turning the ground plane into more of a "height plane" at that point, assuming the object is floating and you have not actually moved underground. For this workflow, the object is on the ground. Make sure to leave enough trace paper above or below your ground plane to complete your perspective.
Horizon Line
Placing your elevation on your ground plane can help you decide on where to place your horizon line. If your horizon line is far above your ground plane, exceeding the height of your elevation, you will have an aerial view. Anywhere in between your ground plane and top elevation height will create a "pulled in" effect that is common for 2pt perspectives and demonstrated in the below video. Feel free to mess around with where you place your horizon line to get the best results for your drawing.
If your drawing is measured and you know the desired viewing height (e.g. the height of someone's eyes relative to a building), place the horizon line at that height on your elevation.
Placing the Vanishing Points
To place the vanishing points, we take the rotational angles of our plan (in our case 45 degrees mirrored on the station line), and project a line from the station point to the picture plane at these angles (one to the left of the station point and the other to the right). Where these projected, angled lines intersect our picture plane is a point, which then gets projected straight down to our horizon line. It is at these two points that we find our Left Vanishing Point (LVP) and our Right Vanishing Point (RVP).
Video Tutorial 2:
Establishing Perspective Planes
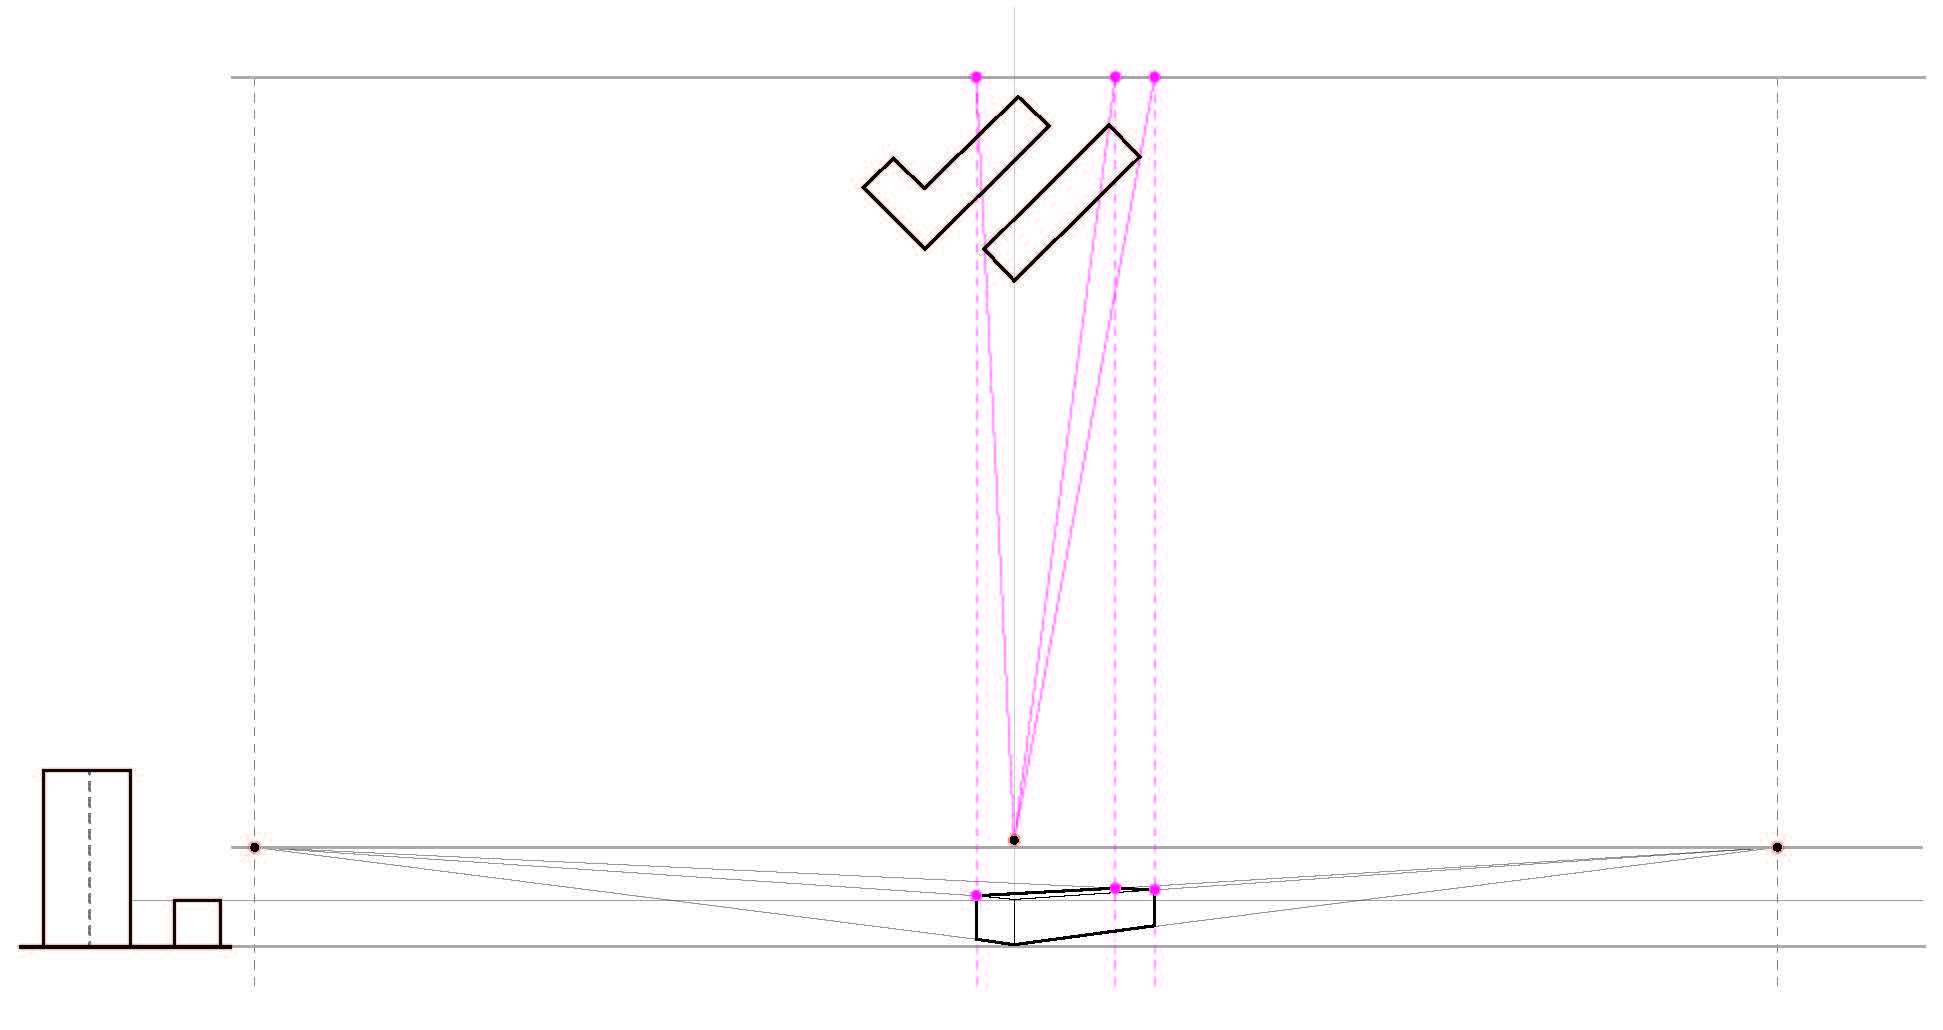
Station Point to Plan Points and Connecting to the Vanishing Points
In order to represent the points in our plan within our perspective, we need to translate them into the perspective space below our plan. Follow this
link
to a separate page with a detailed description of how to do this.
Connecting to the Vanishing Points
The two points we just found can now both be connected to the LVP and the RVP. This will establish the two main planes of our small rectangular object and will help us later on as well.
Video Tutorial 3:
Plan Points to Perspective Points
Continuing to take points in the plan, drawing a line from the station point to these points, through to the picture plane and back down to the ground plane, we can translate the other points in our plan down to our perspective. However, points can only be found if the line drawn down from the picture plane intersects a line in the perspective space, and for the two planes we've established, only two other points in our smaller rectangular object satisfy this need.
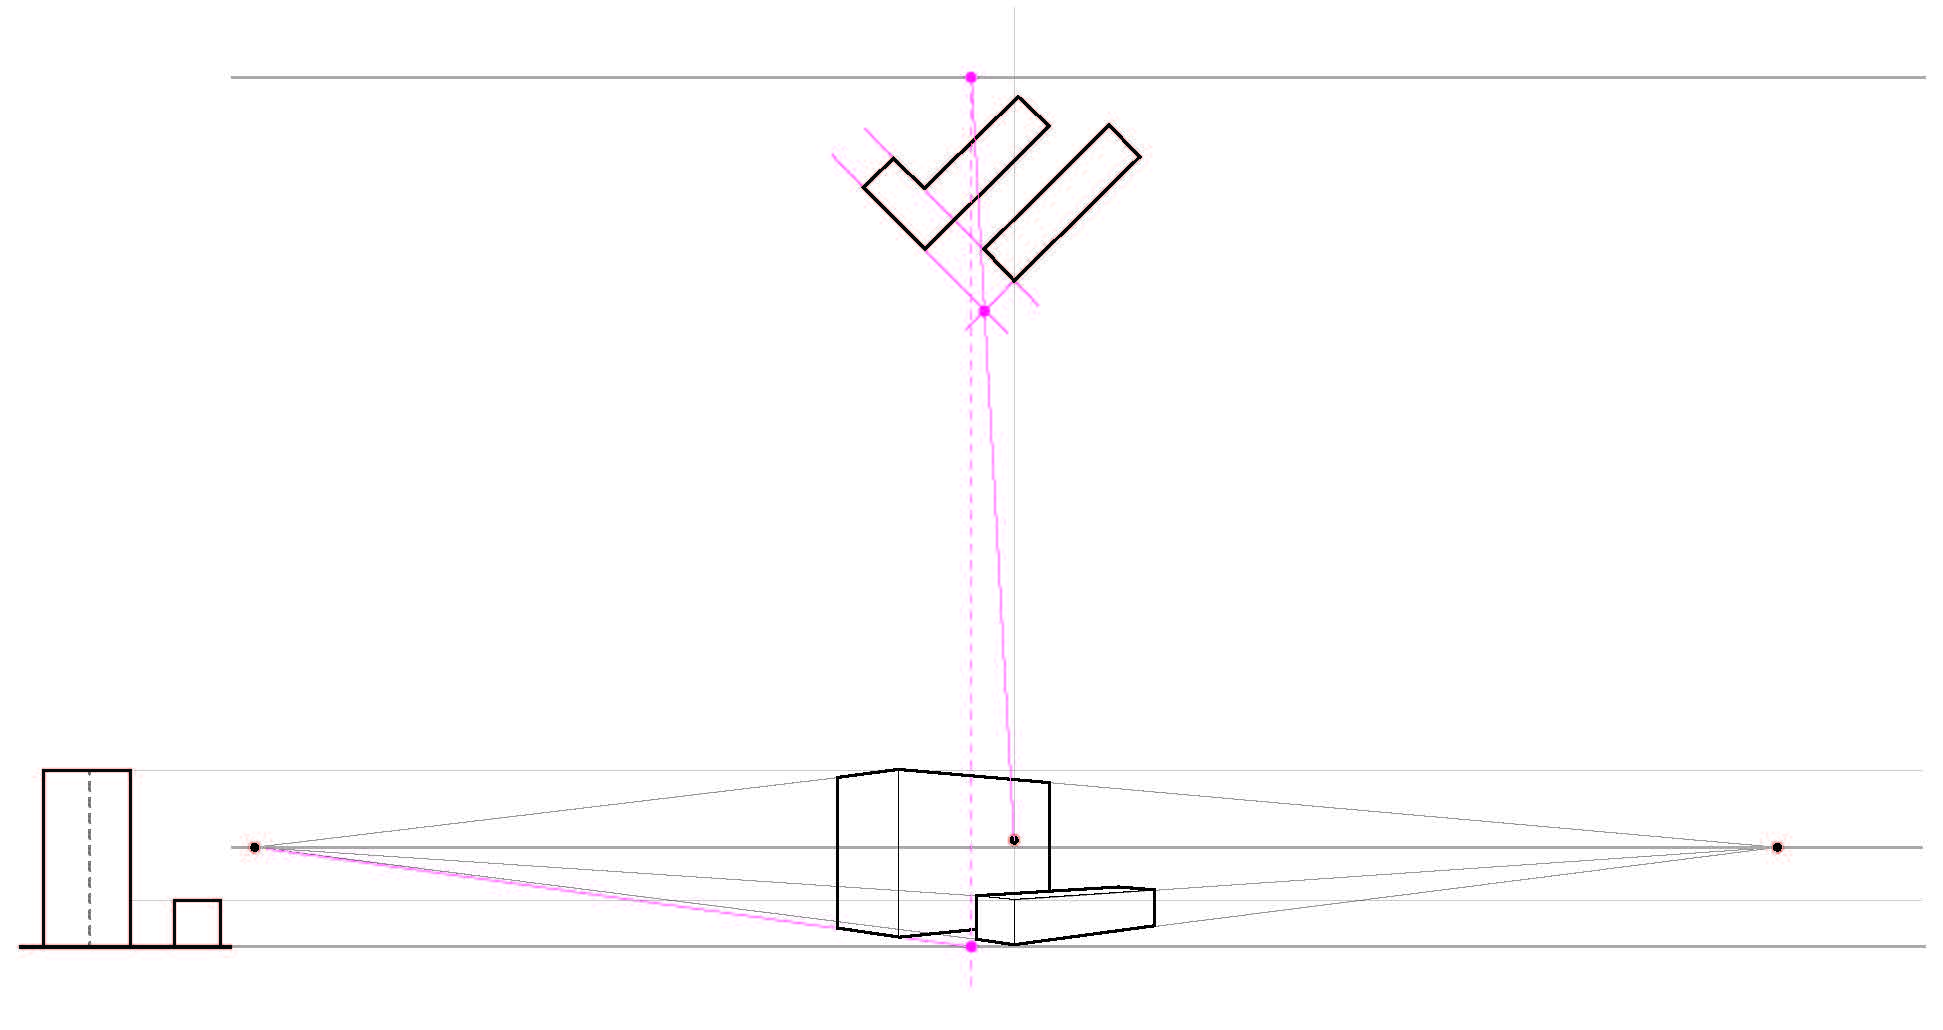
To translate a point in your plan that is behind or out of direct view of the station point (there are multiple of these points in our plan), we must first lay down another line in perspective space for it to intersect. We can do this by finding the point in our perspective that has not been connected to the vanishing point. Once we connect our points to the appropriate vanishing points, we'll find our hidden point in plan has a line to intersect in perspective space.
By following these steps, we can complete the smaller rectangular object in 2pt perspective.
Video Tutorial 4:
Finding points in different planes
When a surface in your plan lies in a different plane than the starting planes established by your first, closest line, you need to find another point of reference for additional planes in your perspective. By continuing lines in your plan until they intersect, you can discover where these planes exists in plan and then draw them down to your perspective space. This is how we find the lowest point in our L-shaped object.
Video Tutorial 5:
Hidden Lines and finishing your perspective
If you wish to give your perspective further dimensionality that simply the exterior lines, you can find the hidden lines that exist out of view from the vantage point in your perspective. This can help contextualize a drawing by adding a further level of projection back into space. However, it can also be distracting if the background, hidden lines are not important to this focus of the drawing. Use them carefully.
Once you are done with the exterior lines, adding thicker lineweights to the closest lines will help establish depth and avoid a "flat" image. All hidden lines should be dashed or dotted and be almost as light as the construction lines.
Video Tutorial 6:
