| Week 9: Daytime Interior Rendering | |
|---|---|
| Course | Arch 100b |
| Date | 2013/03/22 |
| Learning Objectives | In this session we will look at how to effectively convey different qualities of a design through an interior rendering. Emphasis will be placed on the ability to use Photoshop to achieve desired material and lighting effects without having to spend a ton of time rendering these qualities in a 3d model. |
| Agenda |
|
| Uses Tool(s) | Photoshop CS5 |
Interior Renderings
Interior renderings are an important tool for architects that can be used to accurately describe a variety of conditions within a space. They can convey an overall sense or feeling and are helpful for highlighting or contrasting lighting conditions and materiality within a space. Where an exterior rendering helps to give an overall sense of scale, form, and site context, interior renderings help to tell the viewer what that space may be like when inhabited through the use of light, shadows, materials and entourage such as people, plants, etc. (as you learned in last week's workflow on Orthographic Entourage ).
There are many different design intents that can drive an interior rendering as well as methods and techniques that can be used to convey the various qualities discussed above. Some interior renderings are very photorealistic to show exactly how all details of a space would look to a user while others have more of a "hand-sketched" look and tend to be more representational of these qualities. Both can be equally effective means of creating an interior rendering and should be considered when you are deciding what it is that you are trying to convey about your space.
There are also technical challenges that are unique to interior renderings. Two of note are lighting and point-of-view. Lighting can be difficult because the lighting situation is more complex than exterior day lit renders. Typically you will have multiple light sources coming from multiple angles with different expectations of color temperature, which can be challenging to accurately represent. Point of view is challenging in that it's difficult to capture a small interior space or a series of spaces in a single shot without distorting the perspective for the viewer.
While rendering softwares such as V-Ray, 3DS Max, Maya, etc. are all powerful tools for achieving a believable rendering, you can end up spending a lot of time (often too much time) tweaking settings to achieve an exact lighting or textural effect. Photoshop is a powerful tool for post-processing renderings and can often save you a lot of time. Many material and lighting qualities can be applied in Photoshop and need not be modeled and rendered.
Examples and Inspiration
Rendering an Intent
Post-Processing Methods
Tools of Note in Photoshop
Below is a list of useful post-processing tools for creating a successful interior rendering. We touched upon some tools in last week's lecture and workflow that we will be using again in different ways to achieve desired effects. For a refresher on "Selection Tools" and "Clipping Masks" refer back to Week 8: Orthographic Entourage .
Compositing Images
Adjustment Layers
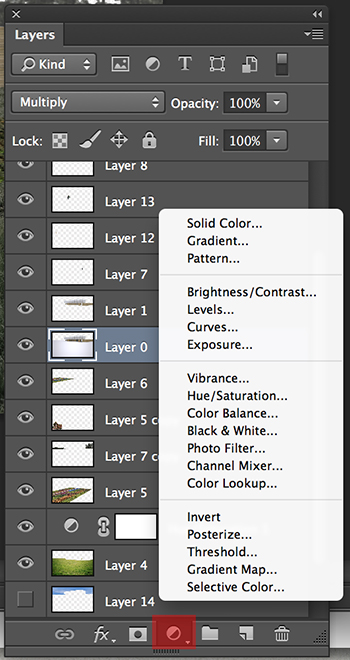
Adjustment layers are very useful when you are editing colors within an image or combining and overlaying multiple rendered images in Photoshop. They allow you to make adjustments to layers color, opacity, levels, saturation and more without permanently altering the original image.
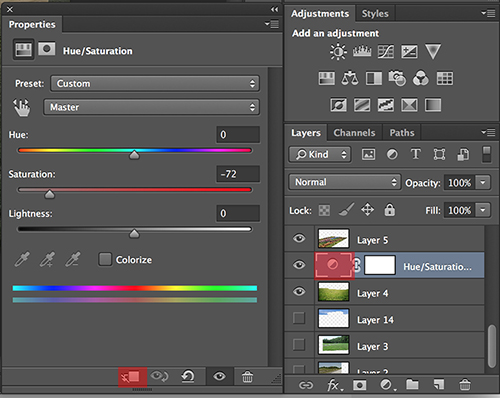
Toolbar Tip : Photoshop, by default, will automatically make adjustments to all layers that are below the layer on which you add the adjustment filter. To make adjustments to a single layer, select the adjustment symbol in the Layers panel and then from the Properties panel select the square symbol at the bottom to clip the adjustment to that layer only.
Layer Blending Modes
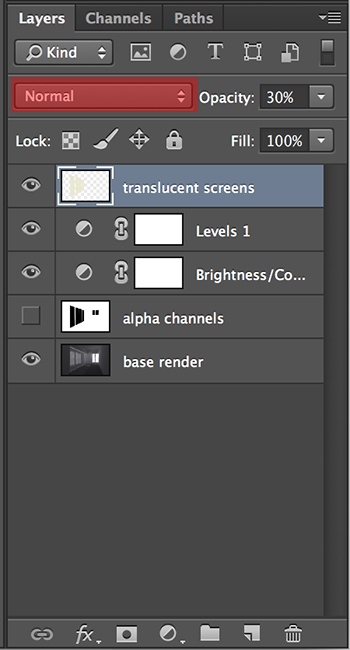
The blending mode specified in the options bar controls how pixels in the image are affected by a painting or editing tool. It is useful for effects such as overlaying colors on an image, creating layer contrasts, and adding diffuse qualities to layers. It’s helpful to think in terms of the following colors when visualizing a blending mode’s effect:
- The base color is the original color in the image.
- The blend color is the color being applied with the painting or editing tool.
- The result color is the color resulting from the blend.
For a more detailed explanation on the different blending modes, refer to the Additional Resources at the bottom of this page.
Selection Adjustment: Quick Mask Mode
Creating a Quick Mask
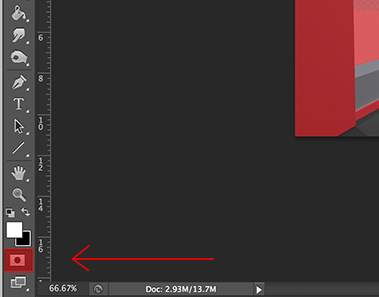
Quick mask mode allows you to visualize how a mask will be applied and gives you various tools to more easily refine the edges of complex selections for greater accuracy. The quick mask mode button is located at the bottom of the tools palette. To use Quick Mask mode, start with a selection and then add to or subtract from it to make the mask. You can also create the mask entirely in Quick Mask mode. Color (by default red) differentiates the protected and unprotected areas. When you leave Quick Mask mode, the unprotected areas become a selection.
Editing a Quick Mask
To edit the mask, select a painting tool from the toolbox. The swatches in the toolbox automatically become black and white. Paint with white to select more of an image (the color overlay is removed from areas painted with white). To deselect areas, paint over them with black (the color overlay covers areas painted with black). Painting with gray or another color creates a semitransparent area, useful for feathering or anti-aliased effects. (Semitransparent areas may not appear to be selected when you exit Quick Mask Mode, but they are.)
Saving Selections and Alpha Channels
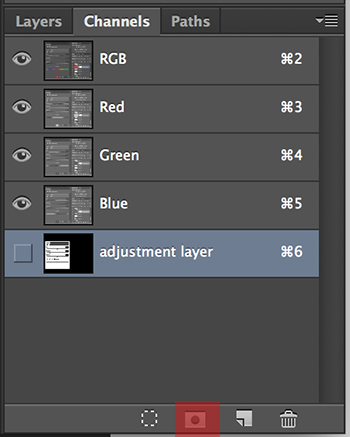
When making complex selections, you can save them by clicking "Select>Save Selection" or by going to the Channels panel and selecting "Save Selection as a Channel" button. This will allow you to bring up the selection on another layer or the same layer later on without having to take the time to re-select a complicated path. This is very useful when working with composite renderings.
Creating Aplha Channels in V-Ray
A useful step in V-Ray that will also save time when rendering in Photoshop is adding Alpha Contribution, especially when you are working with detailed selections. With alpha contribution you have the capability to obtain the alpha channel of each material on the scene. This works by using the scale between 1 and 0, this means 1 no alpha (all White) and 0 full alpha. Open the material editor and click on the material option option tab, then change the number of alpha contribution for each material you want an alpha channel.
Once the image is rendered, you can find the alpha channel on the V-Ray frame buffer. We can then use this image as a a new layer in Phototshop for quickly selecting and adjusting it's contents in the fully rendered image. Be sure to save it as a JPEG to maintain alpha channels.
Adding Lighting Effects
Brush Tool
The brush tool can be used to highlight certain color tones, enhance areas of light, and deepen shadows. With this tool you can adjust the diameter, opacity, and flow. Be sure to have the layer on which you are applying the brush effect selected in the Layers panel before working with the tool.
Burn Tool
The Burn tool is used to darken (burn) specific areas of a photo by increasing or limiting the exposure in those areas. Set the Burn tool to select the “Midtones” of an image in order to bring out the mid range shadow values within the area or layer you selected. Vary the diameter of the tool as well the opacity in order to get an even range of effect across the drawing. Alternatively, the Dodge tool will lighten (dodge) certain areas of a photo.
Today's Workflow: Post-Processing an Interior Rendering Using Photoshop
This workflow will teach how to use a variety of post-processing techniques in Photoshop to create an interior rendering that effectively conveys material and lighting effects.
Related Workflows
- Lighting Adjustments & Select Pixel Editing in Photoshop
- This workflow teaches Photoshop as a tool for adjusting lighting properties within separate layers and manipulating select pixel groupings for an overall photorealistic effect. Adjustment Layers (including filters and transparencies) and basic pixel editing are emphasized. Students will learn an efficient process in lighting adjustments and pixel editing which can be used throughout the design process; from concept development through presentation renderings.
- Creating a Composite Image with the Selection Tool in Photoshop
- This workflow will go through the many ways you can use the selection tool to divide images into separate layers of information that can be edited for specific purposes afterwards.
Today's Exercise: Rendering Textures and Lighting Effects in Photoshop
This exercise has students take a basic interior rendering from V-Ray and create a post-processed rendering in Photoshop. Emphasis is placed on material and lighting effects. The exercise will measure students ability to effectively use methods and tools in Photoshop for accurately describing a variety of conditions within a space.
Additional Resources
- CG Textures
- Tileable and non-tileable images for many different materials.
- Rendering Tutorials
- A series of helpful post-process rendering tools and techniques on architectural graphics by Alex Hogrefe.
- Blending Modes
- An in-depth explanation of the different blending modes in Photoshop.
- Adjustments
- An explanation of adjustments in Photoshop.
